How to Sew a Seat Belt Pillow
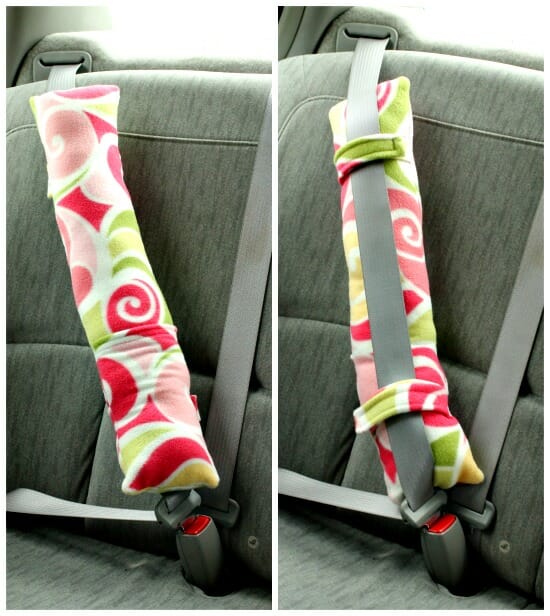
Picture this: your toddler finally drifts off after two hours of “are we there yet,” only for their head to snap forward and bonk against the seat belt. Or you’re the passenger on a six-hour drive, and your neck aches from leaning into a rigid shoulder strap. A seat belt pillow ends both problems for good. This soft, adjustable cushion wraps around the seat belt to cradle your head and shoulders, making every ride feel like a cozy nap.
Below, you’ll learn how to sew a seat belt pillow from start to finish, including material choices, cutting dimensions, tab construction, optional pocket features, and stuffing techniques. Whether you’re a confident beginner or a seasoned seamster, this project takes under an hour and costs less than $10 in supplies.
Choose the Right Materials

Pick Soft, Durable Fabric
Luxury fleece like Shannon Fabrics’ Cloud Spa Cuddle offers a plush, skin-friendly surface that resists pilling. Standard fleece from any craft store works equally well and costs less. Since your face rests directly on this fabric, softness matters more than appearance.
For warmer climates, quilting cotton breathes better but feels less cozy. A popular hybrid uses fleece for the main body with cotton accents on tabs and pockets, adding structure and visual contrast.
Double-sided fleece simplifies sewing because there’s no right or wrong side, making it ideal for first-time makers.
Use Quality Filling and Structure
Premium polyester fiberfill holds its loft after repeated use. Cheap polyfill clumps quickly and flattens into a useless strip within weeks. Always tease the fibers apart by hand before stuffing to remove hidden lumps.
For structural support, you’ll need:
– Mid-weight fusible interfacing (like Pellon Décor Bond) to stiffen tabs and pockets
– Velcro® hook-and-loop strips cut into 3-inch lengths for adjustable closure
Wider Velcro (2 inches) provides stronger hold, while narrower strips (¾ inch) allow finer adjustment for smaller seat belts.
Cut Fabric to Exact Dimensions
Basic Pillow Size
Cut two identical fleece rectangles measuring 26 inches long by 7.5 inches wide. This fits most standard seat belts, which run 22–25 inches from buckle to tongue. After sewing with a ½-inch seam allowance, your finished pillow will measure about 25 inches long.
For a puffier profile, increase the width to 8 inches. For compact cars or children, reduce the length to 24 inches.
Round Corners for a Polished Look
Trace a drinking glass or jar (1.5–2 inches in diameter) onto all four corners of each rectangle. Cut along the traced lines with scissors or a rotary cutter. Rounded corners prevent fraying and give your pillow a professional, store-bought appearance.
Prepare Tabs and Pocket Pieces
Tabs (cut four):
– Cotton fabric: 6 inches x 7 inches
– Interfacing strips: 5 inches x 3 inches
Optional Pocket (cut two):
– Cotton rectangles: 7.5 inches wide x 8.5 inches high
– Interfacing piece: 6.5 inches x 7.5 inches
The pocket adds practical storage for phones, snacks, or coloring books on long trips.
Make Adjustable Velcro Tabs
Fuse and Fold for Strength
- Fold one tab piece in half with wrong sides together, creating a 6-inch x 3.5-inch rectangle. Press firmly to set a sharp center crease.
- Place an interfacing strip on one half of the opened fabric, aligning one 5-inch edge with the center crease. Leave ½ inch of fabric extending beyond the interfacing on the sides and bottom.
- Iron according to the interfacing manufacturer’s instructions until fully bonded.
This reinforcement prevents tabs from bending or sagging when Velcro is fastened.
Attach Velcro Correctly
Label your tabs as either “underlap” (the bottom half that tucks underneath) or “overlap” (the top half that folds over).
On the underlap tab, place the hook side (rough texture) of the Velcro on the interfaced half. On the overlap tab, place the loop side (soft texture). Position each piece ¾ inch from the raw edge and ¾ inch down from the center crease.
Stitch around all four edges of every Velcro strip. If using two narrow strips side by side, add a center zigzag stitch for extra security.
Pro Tip: Test the fold before sewing to confirm that any printed patterns appear right-side up when the tabs overlap.
Sew and Turn the Tabs
- Refold the tab right sides together along the original crease.
- Pin along both sides and the end closest to the Velcro, leaving the opposite end open.
- Sew with a ½-inch seam allowance, pivoting at the corner.
- Clip the corner diagonally to reduce bulk.
- Turn right side out using a chopstick or point turner.
- Press flat for a crisp finish.
Repeat for all four tabs. Optional edgestitching along both sides adds a clean, tailored look.
Add a Functional Pocket (Optional)

Create a Slanted Opening
- Fuse interfacing to the wrong side of one pocket piece, leaving a ½-inch border.
- On both pocket pieces, draw a diagonal line from the top left corner to a point 4 inches up from the bottom on the right edge.
- Cut along this line through both layers.
The slanted top edge lets items slide in and out easily, even while driving.
Finish the Diagonal Edge
- Open bias tape and slip it over the diagonal raw edge with wrong sides together. Pin in place and trim excess tape flush.
- Place both pocket pieces right sides together.
- Sew along the bottom straight edge only, using a ½-inch seam allowance.
- Turn right side out so the bottom seam is enclosed.
- Edgestitch along the bias tape, catching both fabric layers.
Your pocket now has a clean interior and a stylish angled opening.
Assemble the Main Pillow Body

Position Components on the Front Panel
Lay the front fleece panel right side up on your work surface.
Attach the pocket:
– Position it 4½ inches up from the bottom edge
– Align the taller side with the left edge and the shorter side with the right edge
– Pin or baste within the ½-inch seam allowance
Attach the tabs:
– Bottom pair: Place 4½ inches up from the bottom edge
– Top pair: Place 4½ inches down from the top edge
– Align raw edges of tabs flush with the side edges of the main panel
– Ensure Velcro faces inward toward the pillow’s center
Double-check that no tabs are twisted and all Velcro orientations match.
Sandwich and Pin Layers
Place the back fleece panel right side down on top of the front, sandwiching the pocket and tabs between layers. Match all raw edges precisely.
Use clips or pins around the entire perimeter, paying extra attention to tab bases and pocket corners. Verify that tabs sit centered and Velcro stays clear of the seam path.
Sew and Trim the Perimeter
Stitch with Precision
Using a ½-inch seam allowance, sew around all four sides of the pillow. Leave a 3-inch gap on one short end for turning.
Go slowly around rounded corners. Pivot with the needle down, lift the presser foot, rotate the fabric, and continue stitching. Backstitch at both ends of the gap to reinforce the opening.
Reduce Bulk Before Turning
Trim excess seam allowance to about ¼ inch. Clip corners diagonally without cutting through your stitches. For rounded corners, make small notches along the curve so the fabric lies flat when turned.
This step prevents puffy, uneven edges and ensures sharp corners after turning.
Turn, Shape, and Stuff
Turn Right Side Out
Reach through the gap and gently pull the entire pillow right side out. Use a chopstick, knitting needle, or point turner to push out all four corners and curves. Work slowly to avoid poking holes in the fabric.
Shape Without Ironing
Roll the seams between your fingers to flatten them.
Warning: Do not iron plush fleece like Cloud Spa Cuddle. Heat can melt or crush the fibers, permanently ruining the texture.
Prepare and Insert Filling
- Pull small handfuls of polyester fiberfill.
- Tease apart clumps with your fingers to ensure even distribution.
- Start stuffing from the far corners and curves, working toward the opening.
- Fill until the pillow reaches “comfortable firmness,” soft enough to cradle your head but firm enough that you don’t sink onto the hard seat belt underneath.
Goldilocks Rule: If your head touches the plastic belt clip, add more stuffing. If the pillow pushes your neck forward, remove some.
Close the Opening Seamlessly
Hand-Stitch for an Invisible Finish
Fold the raw edges of the gap inward so they meet the sewn seam. Use a ladder stitch (slip stitch) to close by hand. Pull the thread tight after every few stitches to keep the surface flat. Knot securely and bury the thread tail inside the pillow.
This method preserves the pillow’s puffiness and looks professionally made.
Alternative: Machine Topstitch
For a flatter, more structured finish, pin the opening closed and topstitch around the entire perimeter ¼ inch from the edge. This closes the gap and reinforces the shape but compresses the pillow slightly. This method works best on basic models without pockets.
Test and Adjust for Safety

Confirm Proper Fit and Function
- Wrap the pillow around a seat belt.
- Fasten the Velcro tabs, ensuring they overlap by at least 1 inch.
- Verify that the buckle and tongue remain fully accessible and the pillow supports your head above the hard belt mechanism.
- Test for slipping during movement.
Safety First: Passenger Use Only
Never use while driving. The pillow adds bulk that may restrict movement or interfere with airbag deployment. If gifting, clearly label it: “For Passenger Use Only – Not for Drivers.”
Customize and Maintain Your Pillow
Personalize for Style and Use
- Seasonal fabrics: Flannel for winter, lightweight cotton for summer
- Water-resistant material on one side for car-sick travelers
- Contrasting tabs or pocket for a designer touch
- Embroidered names or initials for personalized gifts
Care Instructions
- Spot clean when possible
- Machine wash cold on gentle cycle in a mesh bag if needed
- Air dry flat to protect Velcro and maintain fleece texture
- Clean Velcro regularly with a toothbrush to remove lint and restore grip
Troubleshoot Common Issues
Lumpy or uneven stuffing? You skipped teasing the fiberfill. Always fluff it by hand before inserting.
Tabs won’t stay closed? Check that hook and loop sides are paired correctly and tabs overlap by at least 1 inch.
Corners won’t pop out? You forgot to clip the seam allowance. Always trim and clip before turning.
Pillow twists after sewing? Your seam allowances were inconsistent. Stick to ½ inch throughout the entire project.
Frequently Asked Questions About Seat Belt Pillows
What size should a seat belt pillow be?
The standard finished size is approximately 25 inches long by 6.5 inches wide. This fits most vehicle shoulder belts, which measure 22–25 inches from buckle to tongue. Adjust the length by adding 1 inch to your specific belt measurement to account for seam allowances.
Can I use cotton instead of fleece?
Yes, quilting cotton works well, especially in warm climates where breathability matters. However, cotton feels less plush against the skin and may require interfacing for added structure. For maximum softness, fleece remains the top choice.
How firm should the stuffing be?
Aim for “comfortable firmness.” The pillow should support your head without letting it sink onto the hard seat belt mechanism. If you can feel the plastic clip through the pillow, add more fiberfill. If it pushes your head forward uncomfortably, remove some stuffing.
Is it safe for children to use?
Yes, seat belt pillows are safe for children as passengers. The pillow keeps their head from lolling forward during naps, reducing neck strain. Always ensure the buckle and tongue remain fully accessible and never use the pillow while driving.
How do I wash a seat belt pillow?
Spot clean when possible. For deeper cleaning, machine wash cold on a gentle cycle inside a mesh laundry bag. Air dry flat to preserve the fleece texture and prevent damage to the Velcro closure. Avoid high heat from dryers, which can melt synthetic fibers and weaken Velcro grip.
Can I add a pocket to store items?
Absolutely. Cut two cotton rectangles measuring 7.5 inches wide by 8.5 inches high, add interfacing, and finish the diagonal top edge with bias tape. The angled opening makes it easy to slide phones, snacks, or small toys in and out during travel.
Final Thoughts on Sewing a Seat Belt Pillow
Learning how to sew a seat belt pillow is a rewarding project that solves a real comfort problem. With under $10 in materials and less than an hour of work, you can create a custom cushion that transforms bumpy car rides into cozy journeys.
The key takeaways are simple: choose soft fleece, use premium fiberfill, and take time to position your Velcro tabs correctly. Whether you make the basic version for quick naps or the pocket-equipped upgrade for road-trip essentials, this handmade accessory makes a thoughtful gift for families, frequent travelers, and anyone who values comfort on the road.
Grab your fabric, thread your machine, and start sewing your first seat belt pillow today.