How to Install a Zipper in a Pillow
Adding a zipper to a pillow transforms it from a static decoration into a versatile, washable, and customizable piece. Whether you want to swap seasonal covers, wash cushion covers easily, or store pillows flat to save space, learning how to install a zipper in a pillow is a skill that pays off for years. This guide covers two proven methods, from beginner-friendly techniques to professional upholstery finishes.
You do not need advanced sewing experience to get clean, hidden zippers that hold up to daily use. With the right tools, accurate measurements, and a bit of patience, you can create custom pillow covers that look store-bought. Below, you will find material recommendations, cutting formulas, step-by-step installation instructions, and common mistakes to avoid.
Choose the Right Pillow Form
Pick a High-Quality Insert
The insert you choose affects both the look and the ease of assembly. Feather and down forms are popular because they hold their shape well and have a soft crunch that makes them easy to manipulate when stuffing into a cover. For anyone with allergies, high-density synthetic fills offer similar performance at a lower cost.
A budget-friendly trick is to visit thrift stores like Goodwill and buy inexpensive throw pillows for the inserts only. Discard the old cover, wash the form thoroughly, and you have a premium insert at a fraction of the retail price.
Wash Before Use
Always launder your pillow form before inserting it into a new cover. This step removes dust, odors, and allergens while letting you inspect for weak seams or tears. Use a gentle cycle with low heat, and toss in clean tennis balls when drying down inserts to prevent clumping.
Select and Prep Your Materials
Match Fabric to Function
Your fabric choice sets the tone for durability and style. Consider where the pillow will live and how often it will be used:
- Upholstery weight or velvet works well for living room cushions
- Chenille or vegan leather adds modern texture and visual interest
- Light woven cotton suits casual, frequently washed covers
Mixing textures, such as jewel-tone velvet paired with vegan leather trim, creates a designer look. For outdoor settings, choose water-resistant or indoor/outdoor fabrics. Local upholstery shops often sell smaller remnants at a discount, which are perfect for pillow projects.
Pre-Wash All Fabric
Skipping pre-washing is one of the fastest ways to ruin your finished cover. Natural fibers shrink after their first wash, so a cover that fits perfectly before laundering may become too tight afterward.
Wash and dry your fabric using the same settings you plan to use for future cleanings, then press it flat. This ensures accurate cutting and a snug final fit.
Pick the Correct Zipper
Size and strength matter when selecting a zipper for your pillow:
- #4.5 chain zipper: Best for furniture cushions and high-use pillows
- #2.5 chain zipper: Ideal for light-duty decorative throw pillows
The zipper should be 1 to 2 inches shorter than the pillow’s width. For an 18-inch pillow, a 14 to 16 inch zipper keeps the ends hidden and prevents snagging. Always attach the zipper pull before you begin sewing. Installing it afterward is far more difficult.
Gather Essential Tools
Before you start, make sure you have everything on hand:
- Sewing machine with a zipper foot (a non-stick sole is ideal for sticky fabrics)
- Microtex 90/10 needle for precision stitching
- Fabric scissors or a rotary cutter
- Disappearing ink pen for marking
- Pins or clips (clips work best for leather to avoid permanent holes)
- Iron and ironing board
- Chopstick or turning tool for sharp corners
A non-stick foot is especially important when sewing chenille or vegan leather, since standard feet tend to drag on these surfaces.
Measure and Cut Accurately
Calculate Fabric Size
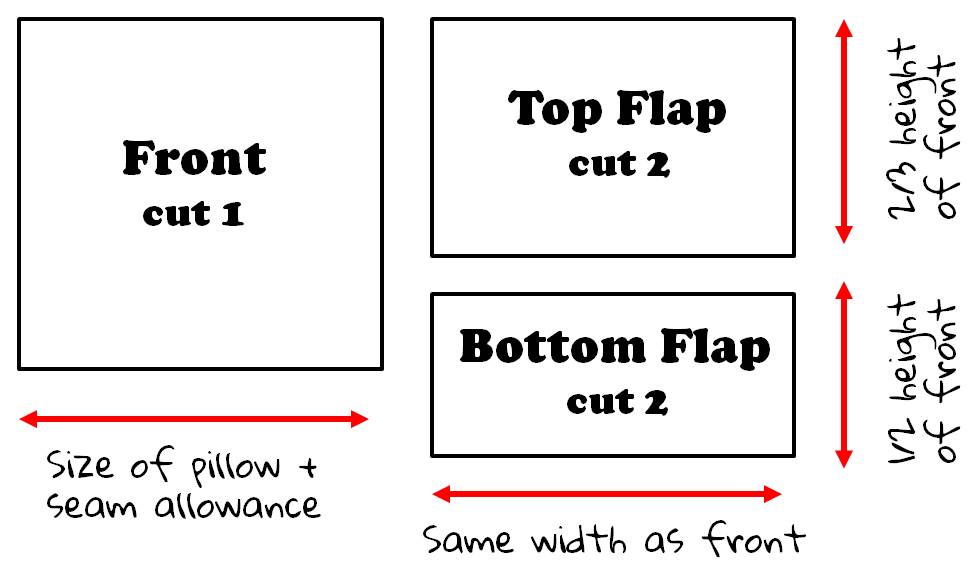
Use this simple formula to determine your cut size:
Cut Size = Pillow Dimension + 1 inch
Add half an inch of seam allowance per side, which totals 1 inch added to both length and width. For an 18″ x 18″ pillow form, cut your fabric to 19″ x 19″. You will need two pieces: one for the front and one for the back.
Handle Complex Designs
For pillows with geometric tops, such as a diamond pattern on a 20-inch pillow, the cutting process requires extra steps:
- Cut one 21-inch square for the top, then subcut diagonally twice to create four triangles.
- Cut one 21-inch square for the backing, then cut it in half diagonally.
- Piece the top triangles together and trim the assembled block to exactly 20″ x 20″.
Press all seams open or to one side. Precision here ensures the cover fits the form snugly.
Install the Zipper: Face-Down Method

This beginner-friendly technique hides the zipper neatly between fabric layers, making it ideal for anyone learning how to install a zipper in a pillow for the first time.
Mark and Baste the Seam
- On the wrong side of one backing piece, mark a line half an inch from the edge (use 5/8 inch for thicker fabrics).
- Place the zipper face down over the line, centered, and mark where the zipper tape ends.
- Remove the zipper and draw a horizontal line between the marks. Draw a vertical line down half an inch from the top edge.
- Set your machine to a basting stitch (4 to 5 mm) and sew along the horizontal line.
- Switch to a standard stitch (2.5 mm) and sew from the raw edge to the basting line on both sides, creating a continuous seam with a basted center gap.
- Press the seam open so the basting line sits in the middle.
Attach the Zipper
- Lay the zipper face down over the basted seam, centering the teeth over the basting line.
- Attach the zipper foot and align it with the zipper tape edge. Shift the needle left to stitch close to the teeth.
- Start sewing half an inch from the zipper end. Stop when the needle reaches the pull.
- Lower the needle, lift the presser foot, slide the pull backward past the needle, lower the foot, and continue sewing.
- Repeat on the opposite side of the zipper tape.
Secure and Reveal
- Stitch perpendicularly across both ends of the zipper tape to lock the pull in place.
- Turn the cover to the right side.
- Use a seam ripper to carefully remove the basting stitches.
The zipper is now hidden, with only the teeth visible when open.
Use the Welt Method for a Professional Finish

For piped or upholstery-grade pillows, this method integrates the zipper with welt cord for a fully concealed, high-end look.
Prepare the Zipper
- Cut the zipper 1 to 2 inches shorter than the pillow width.
- Create a pull pocket by folding a 2″ x 2″ fabric scrap, sewing three sides, and attaching it over the zipper pull end to hide it.
- Sew a fabric tab across the opposite end to finish the tape.
Sew with Welt Cord
- If using piping, place the welt cord along the pillow edge with right sides together.
- Position the zipper between the cord ends, centered.
- Start sewing at the corner, stitching from the tab end outward toward the zipper.
- Sew as close as possible to both the zipper teeth and the welt cord.
- Ensure at least half the zipper teeth are covered by the folded fabric edge.
Finish the Seam
- Fold the second pillow piece over by half an inch.
- Topstitch it to the zipper assembly, enclosing the raw edge.
- The result is a fully concealed zipper with only a clean seam visible.
Backstitch at the start and end points to reinforce stress areas.
Assemble the Pillow Cover
Align and Pin Layers
- Place the front and back pieces right sides together.
- Ensure the zipper is open at least halfway. This step is critical for turning the cover later.
- Pin or clip all four edges, matching raw edges perfectly.
Misalignment at this stage leads to lopsided seams and uneven corners.
Sew the Perimeter
- Use a half-inch seam allowance.
- Sew all the way around, pivoting at corners with the needle down to create sharp angles.
- For geometric designs, stitch diagonally across the zipper-side corner to match the pattern.
Trim Corners
To reduce bulk and achieve crisp points:
- Cut a quarter to half an inch off each corner diagonally.
- Avoid cutting through your stitches.
Turn and Shape
- Reach through the open zipper and pull the cover right-side out.
- Use a chopstick or turning tool to gently push out each corner.
- Press lightly with an iron if needed, using a pressing cloth on vegan leather.
Topstitch for Polish
- Topstitch a quarter inch from the edge around the entire pillow.
- This step flattens seam allowances, secures the zipper ends, and gives a custom look.
Matching thread creates an invisible finish, while contrasting thread adds an industrial accent.
Insert and Maintain Your Pillow
Add the Insert
- Unzip the cover fully.
- Compress the pillow form and feed it through the opening, corner-first for a snug fit.
- Zip closed.
Feather and down forms are easiest to maneuver into tight covers.
Clean and Store Smartly
- Machine wash removable covers according to the fabric care label.
- Spot clean when full washing is not necessary.
- Store covers flat when not in use to save space and prevent creasing.
Avoid These Common Mistakes
Forgetting to Open the Zipper
Sewing the final seam with the zipper closed leaves you unable to turn the cover right-side out. Always leave it half-open before sewing the perimeter.
This is the most common beginner error, and it means ripping out stitches.
Wrong Seam Allowance
Using a quarter-inch seam instead of half an inch throws off your sizing. A cover cut for half-inch allowance will be 1 inch too small per side if sewn with quarter-inch seams.
Stick to half inch unless your pattern specifies otherwise.
Skipping Corner Trims
Untrimmed corners create bulky, rounded edges. Diagonal cuts reduce bulk and deliver sharp, professional corners.
Do not skip this final detail.
Frequently Asked Questions About Installing a Zipper in a Pillow
What size zipper do I need for a standard throw pillow?
For most throw pillows, a 12 to 14 inch zipper works well. The general rule is to choose a zipper 1 to 2 inches shorter than the pillow’s width so the ends stay hidden and the pull does not snag.
Can I install a zipper without a sewing machine?
Hand-sewing a zipper is possible but time-consuming and difficult to get neat. A sewing machine with a zipper foot gives the cleanest, most durable results. For beginners, the basting method described above makes machine sewing much more forgiving.
What is the easiest zipper installation method for beginners?
The face-down basting method is widely recommended for beginners. It hides the zipper between fabric layers and uses temporary basting stitches to guide your final seam, eliminating the need for perfect alignment of visible teeth during the initial sewing phase.
How do I keep vegan leather from sticking to my presser foot?
Use a non-stick zipper foot (Teflon or roller style) when sewing vegan leather or chenille. Standard metal feet drag on these fabrics, causing uneven feeding and missed stitches. A non-stick sole glides smoothly and protects your material.
Should I pre-wash my fabric before cutting?
Yes. Pre-washing is essential, especially for natural fibers like cotton and linen, which shrink after the first wash. Skipping this step can leave you with a cover that no longer fits your insert after laundering.
How do I fix a pillow cover that turned out too small?
If your cover is too tight, the most common cause is incorrect seam allowance. Measure your seams and compare them to the half-inch standard. Unfortunately, the fix usually requires ripping out seams and resewing with the correct allowance, or recutting fabric if there is enough material left.
Key Takeaways for Installing a Zipper in a Pillow
Learning how to install a zipper in a pillow opens up endless possibilities for custom home decor. Start with quality materials: a clean pillow form, pre-washed fabric, and the right zipper size. Measure carefully using the formula Cut Size = Pillow Dimension + 1 inch, and choose the face-down method for your first project since it is the most forgiving for beginners.
Precision matters at every stage, from marking seam lines to trimming corners. Always leave the zipper half-open before sewing the final perimeter, and reinforce stress points with backstitching. With these techniques, you will create durable, washable pillow covers that look professional and last for years.
Ready to start? Gather your materials, pick a fabric that inspires you, and give it a try this weekend.