How to Make a Round Envelope Pillow Cover
Have you ever wanted to refresh your living room or reading nook with a custom round pillow? A round envelope pillow cover is the perfect DIY project, simple enough for beginners yet stylish enough for design lovers. This removable, washable cover fits snugly over a store-bought insert and lets you swap fabrics whenever you want a new look. No zippers, no fuss, just clean overlapping panels that hold everything in place.
You’ll learn how to cut perfect circles, create neat envelope flaps, and assemble a professional-looking cover from start to finish. We’ll walk through precise measurements, fabric choices, and pro tips to avoid puckering or misshapen edges. By the end, you’ll have a sleek, durable pillow cover that looks store-bought but carries your personal touch.
Cut Perfect Circles Every Time

Use a Homemade Fabric Compass
Your circles must be perfectly symmetrical for a polished result. The easiest way to achieve this is with a homemade compass made from string, a pencil, and a thumbtack. Measure the radius (half the diameter) of your desired cut circle, then tie the string to the pencil at that length. Anchor the thumbtack at the center of your folded fabric and rotate the pencil around it in a full circle.
This method ensures precision without expensive tools. Always cut on a flat surface with sharp scissors or a rotary cutter to maintain clean, smooth edges.
Fold Fabric for Accuracy
Fold your fabric in half, then in half again to create quarters. Place your thumbtack at the corner point where the folds meet. This becomes your circle’s center. Drawing on folded fabric ensures symmetry because you’re only tracing one-quarter of the circle at a time.
Once traced, cut along the line while keeping all layers pinned together. This technique prevents misalignment and guarantees both front and back pieces match exactly. Remove pins only when you’re ready to sew.
Select the Right Fabric and Tools

Choose Woven, Non-Stretch Fabrics
Use woven fabrics like quilting cotton, linen, canvas, or upholstery cloth. These hold their shape and resist distortion when sewn into circles. Avoid knits or stretchy materials because they’ll warp during sewing and create uneven edges.
For a high-end look, linen or linen-cotton blends offer texture and durability. For kids’ rooms or high-use areas, opt for canvas or duck cloth. You can even repurpose old tablecloths, napkins, or drop cloths if they’re tightly woven and stain-free.
Gather Essential Sewing Supplies
You will need:
– Sharp fabric scissors or a rotary cutter
– Ruler, measuring tape, and fabric marker
– Sewing machine with matching thread
– Iron and ironing board
– Pins or clips
– Zipper foot (helpful for clean edges)
– Blunt tool (like a chopstick) for pushing out curves
Having the right tools makes the process faster and more accurate. Pre-wash and iron your fabric before cutting to prevent shrinkage later.
Calculate Dimensions Correctly

Size for a Snug-Fit Cover
Your cover should fit tightly around the insert to avoid sagging. Use this simple formula:
Cut Diameter = Insert Diameter + 1 inch (for ½-inch seam allowance on both sides)
For example, if your insert is 24 inches, cut your circle to 25 inches in diameter. The radius would be 12.5 inches, which you’ll use for drawing the circle. Always double-check your math before cutting because there’s no undo button in fabric.
Plan Envelope Overlap
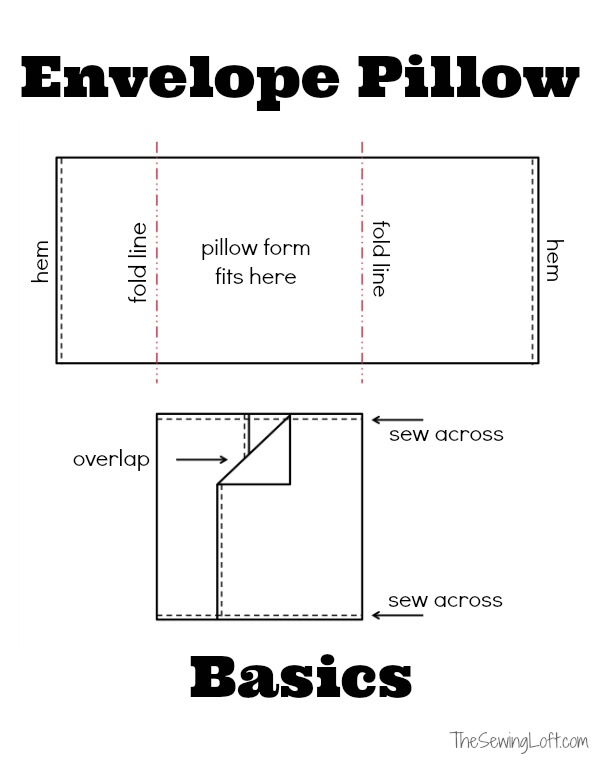
The envelope back requires two overlapping panels, each shaped like a half circle with an extended straight edge. To size them, fold your front circle in half and use this folded half as a pattern. Add 3 to 4 inches to the straight edge for overlap, then cut two identical back pieces using this extended template.
This ensures the opening stays hidden and the insert won’t slip out during use.
Cut and Prepare Back Panels
Create Overlapping Envelope Flaps
After cutting the front circle, lay it flat and fold it in half. Trace this half-circle onto your fabric for the back panels, then extend the straight edge by 3 to 4 inches. This extension becomes the overlap that hides the pillow insert.
Cut two of these extended semi-circles. These are your envelope back panels. Make sure both are identical for a balanced, symmetrical look.
Pre-Hem the Back Edges
To finish the inner edges cleanly:
1. Fold the straight edge of each back panel ¼ inch toward the wrong side
2. Fold it again ¼ to ½ inch to encase the raw edge
3. Press with a hot iron
4. Topstitch along the inner folded edge to secure
This double hem prevents fraying and gives a polished look when the cover is opened. Use matching thread and a straight stitch for a clean line.
Assemble the Pillow Cover
Layer Pieces Correctly
Now it’s time to sew. Here’s how to layer everything:
1. Place the front circle right side up
2. Lay the two back panels on top, right sides down
3. Position them so the hemmed edges face inward and overlap in the center
4. Align all outer curved edges perfectly
Pin generously around the circle, every 2 to 3 inches, to prevent shifting during sewing. Use clips if your fabric is slippery.
Sew the Outer Seam
Using a ½-inch seam allowance, sew around the entire circle. Keep the front piece on the bottom as you feed it through the machine to maintain even pressure.
Pro Tip: When sewing curves, pivot frequently. Lower the needle into the fabric, lift the presser foot, rotate the fabric slightly, then lower the foot and continue. This keeps the seam smooth and prevents jagged edges. Backstitch at the start and end to lock the seam.
Finish and Refine the Cover

Trim and Clip Seam Allowances
After sewing, trim excess fabric from the seam allowance to ½ inch. Then cut V-shaped notches every ½ inch along the curved edge. These notches allow the cover to turn right-side out without puckering.
Be careful not to cut into the stitches. Snip close to the seam, but not through it.
Turn and Press Smoothly
Turn the cover right-side out through the envelope opening. Use a blunt tool like a chopstick or knitting needle to gently push out the curved edges. Work slowly to avoid poking holes in the fabric.
Once turned, press the entire edge with a hot iron. This flattens the seam and gives the pillow a crisp, professional finish.
Insert Pillow and Style
Choose the Right Insert
Use a down or down-blend insert slightly larger than the cover for a plump, luxurious look. For example, a 24-inch insert in a 23-inch cover creates a snug, full fit. Polyester inserts work too but may flatten over time.
Never stuff a removable cover with loose filling. These covers are meant to slip over pre-made inserts for easy washing.
Close and Fluff
Slide the insert through the envelope opening. Adjust it so it fills the cover evenly. The overlapping back panels will hide the opening completely.
Fluff the edges gently with your fingers to round out the shape. If you used piping or contrasting fabric, this is where your design really shines.
Frequently Asked Questions About Round Envelope Pillow Covers
What size should I cut my fabric for a 20-inch round pillow insert?
Cut your circle to 21 inches in diameter. This adds 1 inch total for the ½-inch seam allowance on each side, giving you a snug 20-inch finished cover.
Can I use stretchy fabric like jersey knit for this project?
No, stretchy knits will distort the circular shape and create wavy, uneven edges. Stick to woven fabrics like quilting cotton, linen, or canvas for the best results.
How much overlap do the envelope back panels need?
Each back panel should have 3 to 4 inches of extra length on the straight edge. When overlapped in the center, this creates a secure closure that hides the insert completely.
Do I need a special sewing machine foot for curves?
A standard presser foot works fine for sewing the outer circle. However, a zipper foot is helpful if you plan to add piping or trim around the edge for a decorative finish.
How do I prevent the fabric from bunching when sewing curves?
Sew slowly and pivot frequently by stopping with the needle down, lifting the presser foot, and rotating the fabric before continuing. This creates smooth, even curves without jagged tucks.
Can I wash the finished pillow cover in a washing machine?
Yes, envelope covers are designed for easy removal and washing. Follow your fabric’s care instructions, typically a cold gentle cycle, then air dry or tumble dry on low to prevent shrinkage.
Key Takeaways for Crafting Your Round Envelope Pillow Cover
Making a round envelope pillow cover combines precision, creativity, and practicality. Start with accurate measurements using the diameter-plus-one-inch formula, choose a stable woven fabric, and cut perfect circles with a homemade compass. The envelope back eliminates the need for zippers while keeping your insert secure and your cover fully washable.
Your most important steps are cutting symmetrical circles, hemming the back panels cleanly, and pivoting often while sewing curves. These details separate a homemade look from a professional finish.
Ready to start sewing? Pick your favorite fabric, gather your supplies, and cut that first circle. Your custom round pillow is just a few stitches away, and once you make one, you’ll want to create a whole set for every room in your home.