How to Make Toss Pillow Covers: Quick Steps
Tired of spending $40 or more on a single decorative pillow from the store? You can make toss pillow covers at home for a fraction of the price, using just basic sewing supplies. The envelope-style closure requires no zippers, buttons, or special hardware—just clean folds and straight seams. In under 15 minutes, you’ll have a custom, washable cover that looks professionally made.
This guide covers everything you need to know to make toss pillow covers with confidence. You’ll learn how to choose the right fabric, calculate exact cutting dimensions, sew crisp seams, and avoid the most common beginner mistakes. Whether you’re refreshing your living room, making holiday decor, or crafting a thoughtful handmade gift, this project delivers maximum impact with minimal effort.
Pick the Best Fabric for Your Pillow Covers

Match Fabric Weight to Your Project
The fabric you choose sets the tone for durability, texture, and care. Since toss pillow covers get swapped and washed often, pick something that fits your lifestyle.
- Cotton (quilting weight): The best choice for beginners. It holds its shape, presses cleanly, and survives frequent machine washing.
- Linen: Breathable and strong with a relaxed, upscale look. Expect natural wrinkles that add character.
- Denim or canvas: Built for heavy use. Ideal for family rooms, kids’ spaces, or outdoor seating.
- Velvet: Luxurious and soft, but tricky to sew. Always align the nap direction so colors match across multiple pillows.
- Drop cloth: Budget-friendly and rustic. Perfect for stenciling, painting, or monogramming.
- Polyester blends: Affordable and wrinkle-resistant. A solid pick for high-volume projects.
Avoid silk or rayon for your first attempt. These slippery fabrics shift under the presser foot and frustrate new sewists.
Pre-Wash Every Fabric Before Cutting
Natural fibers like cotton and linen can shrink up to 5% after their first wash. If you skip this step, your finished cover may end up too tight for the insert. Wash and dry your fabric using the same settings you plan to use later, then press it flat before measuring.
Gather Your Sewing Supplies
Essential Tools for Clean Results
You don’t need expensive equipment to make toss pillow covers that look store-bought. Here’s your starter checklist:
- Rotary cutter, acrylic ruler, and self-healing mat: Produce straighter, faster cuts than scissors.
- Fabric scissors: For trimming threads and small snips.
- Tape measure and fabric chalk: Mark fold lines and check dimensions.
- Pins or Wonder Clips: Hold layers together. Clips work better on thick or slick fabric.
- Sewing machine: Any basic model works. Use a universal 80/12 needle and all-purpose thread.
- Iron and ironing board: Pressing every fold is the secret to professional results.
- Pencil or chopstick: Push out corners for a sharp finish after turning.
Pro Tip: No sewing machine? Hand-sewers can still complete this project using a strong backstitch. It takes longer, but the result is identical.
Calculate Fabric Dimensions Accurately
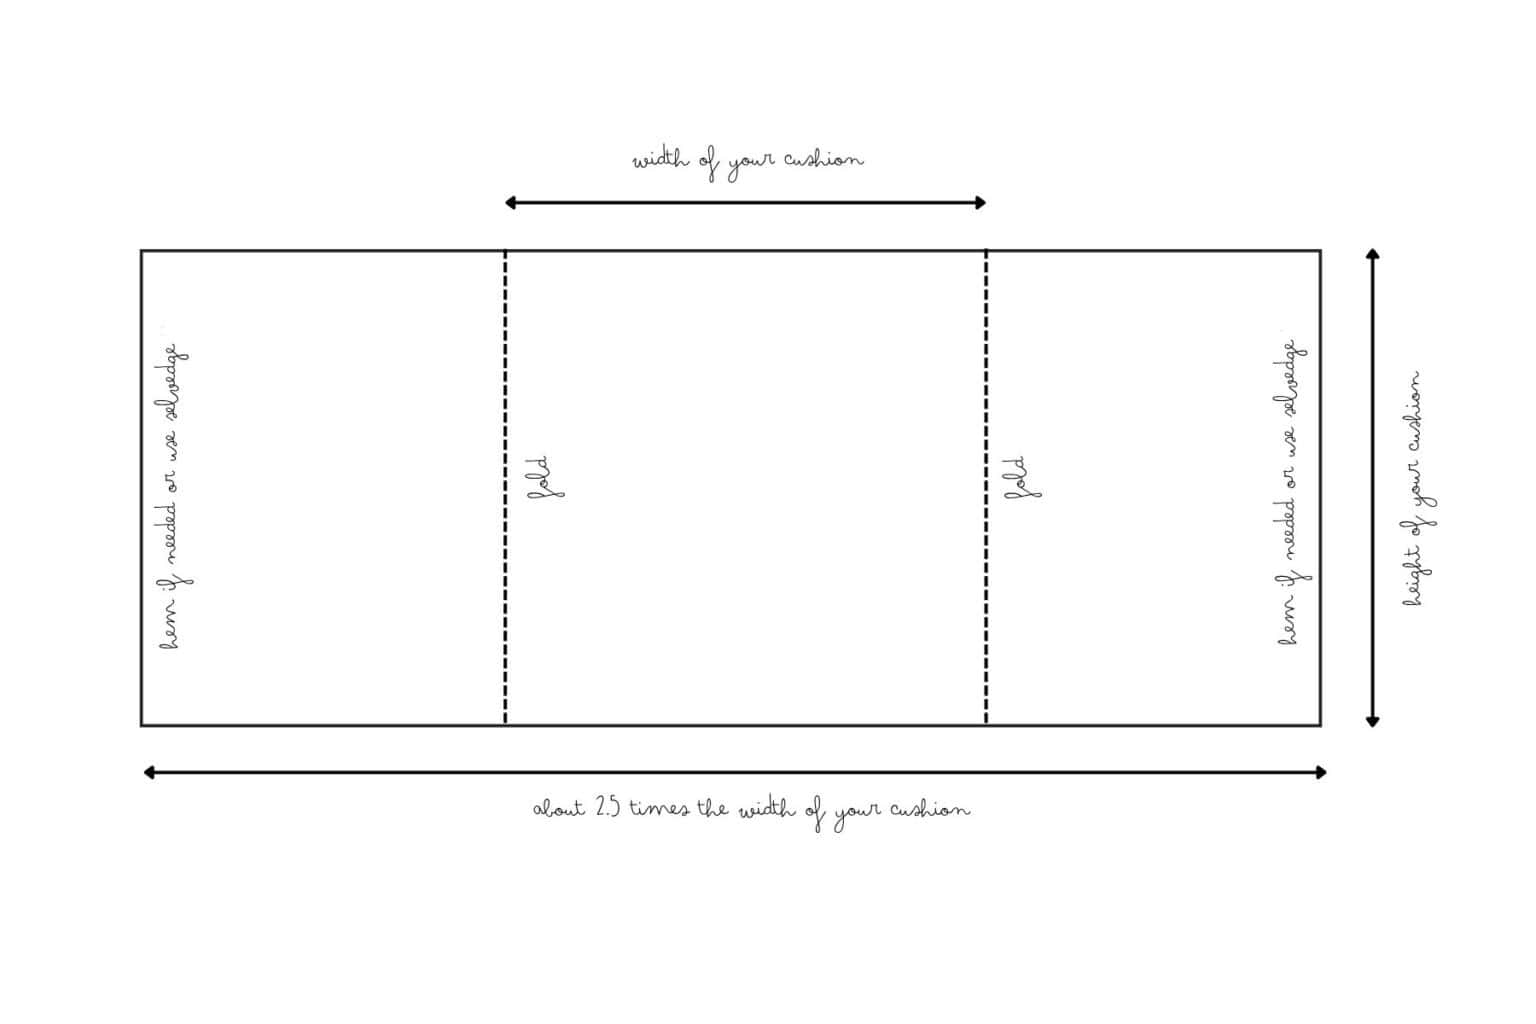
Use the One-Piece Formula for Speed
The fastest way to make toss pillow covers is cutting a single rectangle that folds into an envelope back. This method reduces waste and eliminates extra seams.
Cutting Formula:
– Width: Pillow size + 1 inch (accounts for ½-inch seam allowance on both sides)
– Length: (Pillow size × 2) + 5 inches (overlap) + 2 inches (double hems)
Ready-Made Cutting Chart:
| Pillow Size | Cut Width | Cut Length |
|---|---|---|
| 16″ | 17″ | 39″ |
| 18″ | 19″ | 43″ |
| 20″ | 21″ | 47″ |
| 24″ | 25″ | 55″ |
Cut along the grain using a rotary cutter for the cleanest edges. Press all fold lines before sewing.
Try the Three-Piece Method for Scraps or Contrast Backs
Want to use up fabric remnants or add a contrasting back? Cut three separate panels instead.
- Front panel: Cut to the exact pillow size (e.g., 20″ × 20″).
- Back panel A: Cut to the pillow width × 60% of pillow height (e.g., 20″ × 14″).
- Back panel B: Cut to the pillow width × the remaining height (e.g., 20″ × 12″).
The two back panels must overlap by at least 3 to 5 inches when assembled. This prevents the white insert from peeking through the opening.
Hem the Envelope Opening Edges
Create Clean, Finished Flaps
The envelope closure depends on neatly hemmed edges. Whether you use the one-piece or three-piece method, the process is the same.
- Fold one raw edge ½ inch toward the wrong side of the fabric. Press flat.
- Fold again ½ inch to fully encase the raw edge. Press once more.
- Topstitch along the inner fold using a ¼-inch seam allowance.
- Repeat on the opposite edge.
For the three-piece method, hem only one long edge of each back panel instead of the short ends.
Pro Tip: Mark your stitching line with chalk or use a seam guide on your machine. Straight hems are the difference between homemade and handmade-with-pride.
Assemble the Cover Layers
Fold and Pin for the One-Piece Method
- Lay the fabric right side up on your work surface.
- Fold the left hemmed edge toward the center.
- Fold the right hemmed edge over the first, creating a 5-inch overlap in the middle.
- Pin or clip the two layers together along the open side edges.
Check that any printed pattern faces the correct direction before moving on.
Layer Correctly for the Three-Piece Method
- Place the front panel right side up.
- Lay back panel A right side down, aligning raw edges. The hemmed edge should point toward the center.
- Place back panel B right side down on top, overlapping panel A by 3 to 5 inches. Its hemmed edge also faces inward.
- Pin all four edges to lock the layers in place.
Sew the Side Seams
Stitch with a Consistent ½-Inch Seam
- Set your sewing machine to a straight stitch with a ½-inch seam allowance.
- Starting at one corner, sew around all four sides of the cover.
- Backstitch at the start and finish to secure the threads.
- At each corner, stop with the needle in the fabric, lift the presser foot, pivot the fabric, then continue stitching.
In the one-piece method, you’re sewing the top and bottom edges created by the fold. In the three-piece method, you’re stitching the full perimeter.
Optional: Finish the raw seam allowances with a zigzag stitch, serger, or pinking shears to prevent fraying over time.
Turn, Shape, and Press the Finished Cover
Create Crisp, Store-Bought Corners
- Trim the corners: Cut diagonally across each corner, staying close to (but not through) the stitching. This removes bulk and helps corners lie flat.
- Turn right side out: Reach through the envelope opening and pull the fabric through.
- Push out corners: Use a pencil, chopstick, or turning tool to gently shape each corner until it’s sharp and square.
- Press thoroughly: Iron the entire cover, focusing on the seams and the envelope opening.
Insert your pillow form last. Adjust the corners and fluff until the cover looks plump and smooth.
Troubleshoot Common Beginner Mistakes
Fix Problems Before They Start
- Pillow insert peeking through the back? Your overlap is too small. Aim for at least 3 to 5 inches of coverage on every cover.
- Cover looks loose or saggy? You may have added extra seam allowance to the final measurement. Cut based on the insert size, not larger.
- Seams came out crooked? Skipped the pressing step. Always iron every fold before stitching.
- Corners look bunchy or lumpy? You forgot to trim the corner triangles. Snip them close to the seam before turning.
Customize Your Covers with Simple Design Upgrades
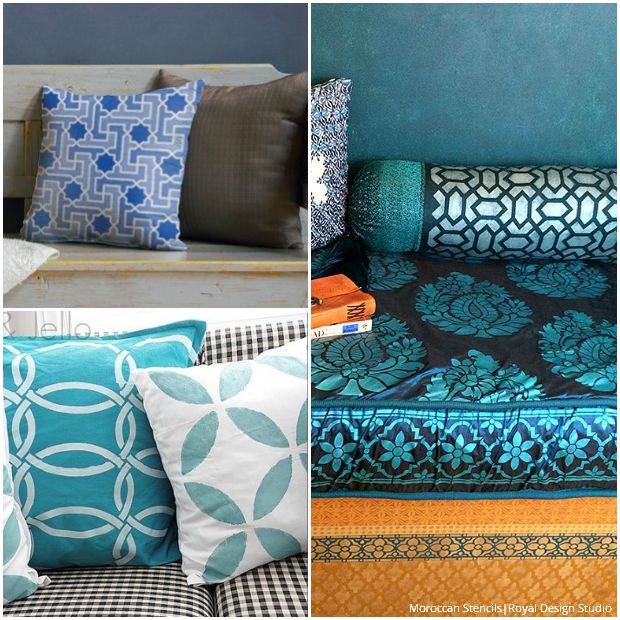
Add Personality in Minutes
Once you’ve nailed the basics, try these easy variations:
- Mix textures: Pair linen fronts with velvet backs for a designer layered look.
- Stencil or paint: Use fabric paint on drop cloth or solid cotton for holidays or monograms.
- Patchwork fronts: Sew scraps together before cutting to size for a boho statement piece.
- Embellishments: Stitch on tassels, pom-poms, or ribbon trim before turning the cover right side out.
- Contrast binding: Add a fabric border around the seams for a pop of color.
Styling Tip: Cluster different sizes together—pair 18-inch and 20-inch covers on the same sofa for visual depth.
Care for Your Covers So They Last for Years
Simple Maintenance for Long-Term Use
Envelope-style covers are designed for easy care:
- Remove and wash separately from the pillow insert.
- Turn inside out to protect printed or painted surfaces.
- Machine wash cold on a gentle cycle.
- Tumble dry low or line dry to minimize shrinkage.
- Reinforce stress points like the overlap corner with a bar tack or extra backstitch for heavy-use pillows.
With proper care, cotton and linen covers stay vibrant for years of seasonal swaps.
Compare Envelope, Zipper, and Velcro Closures
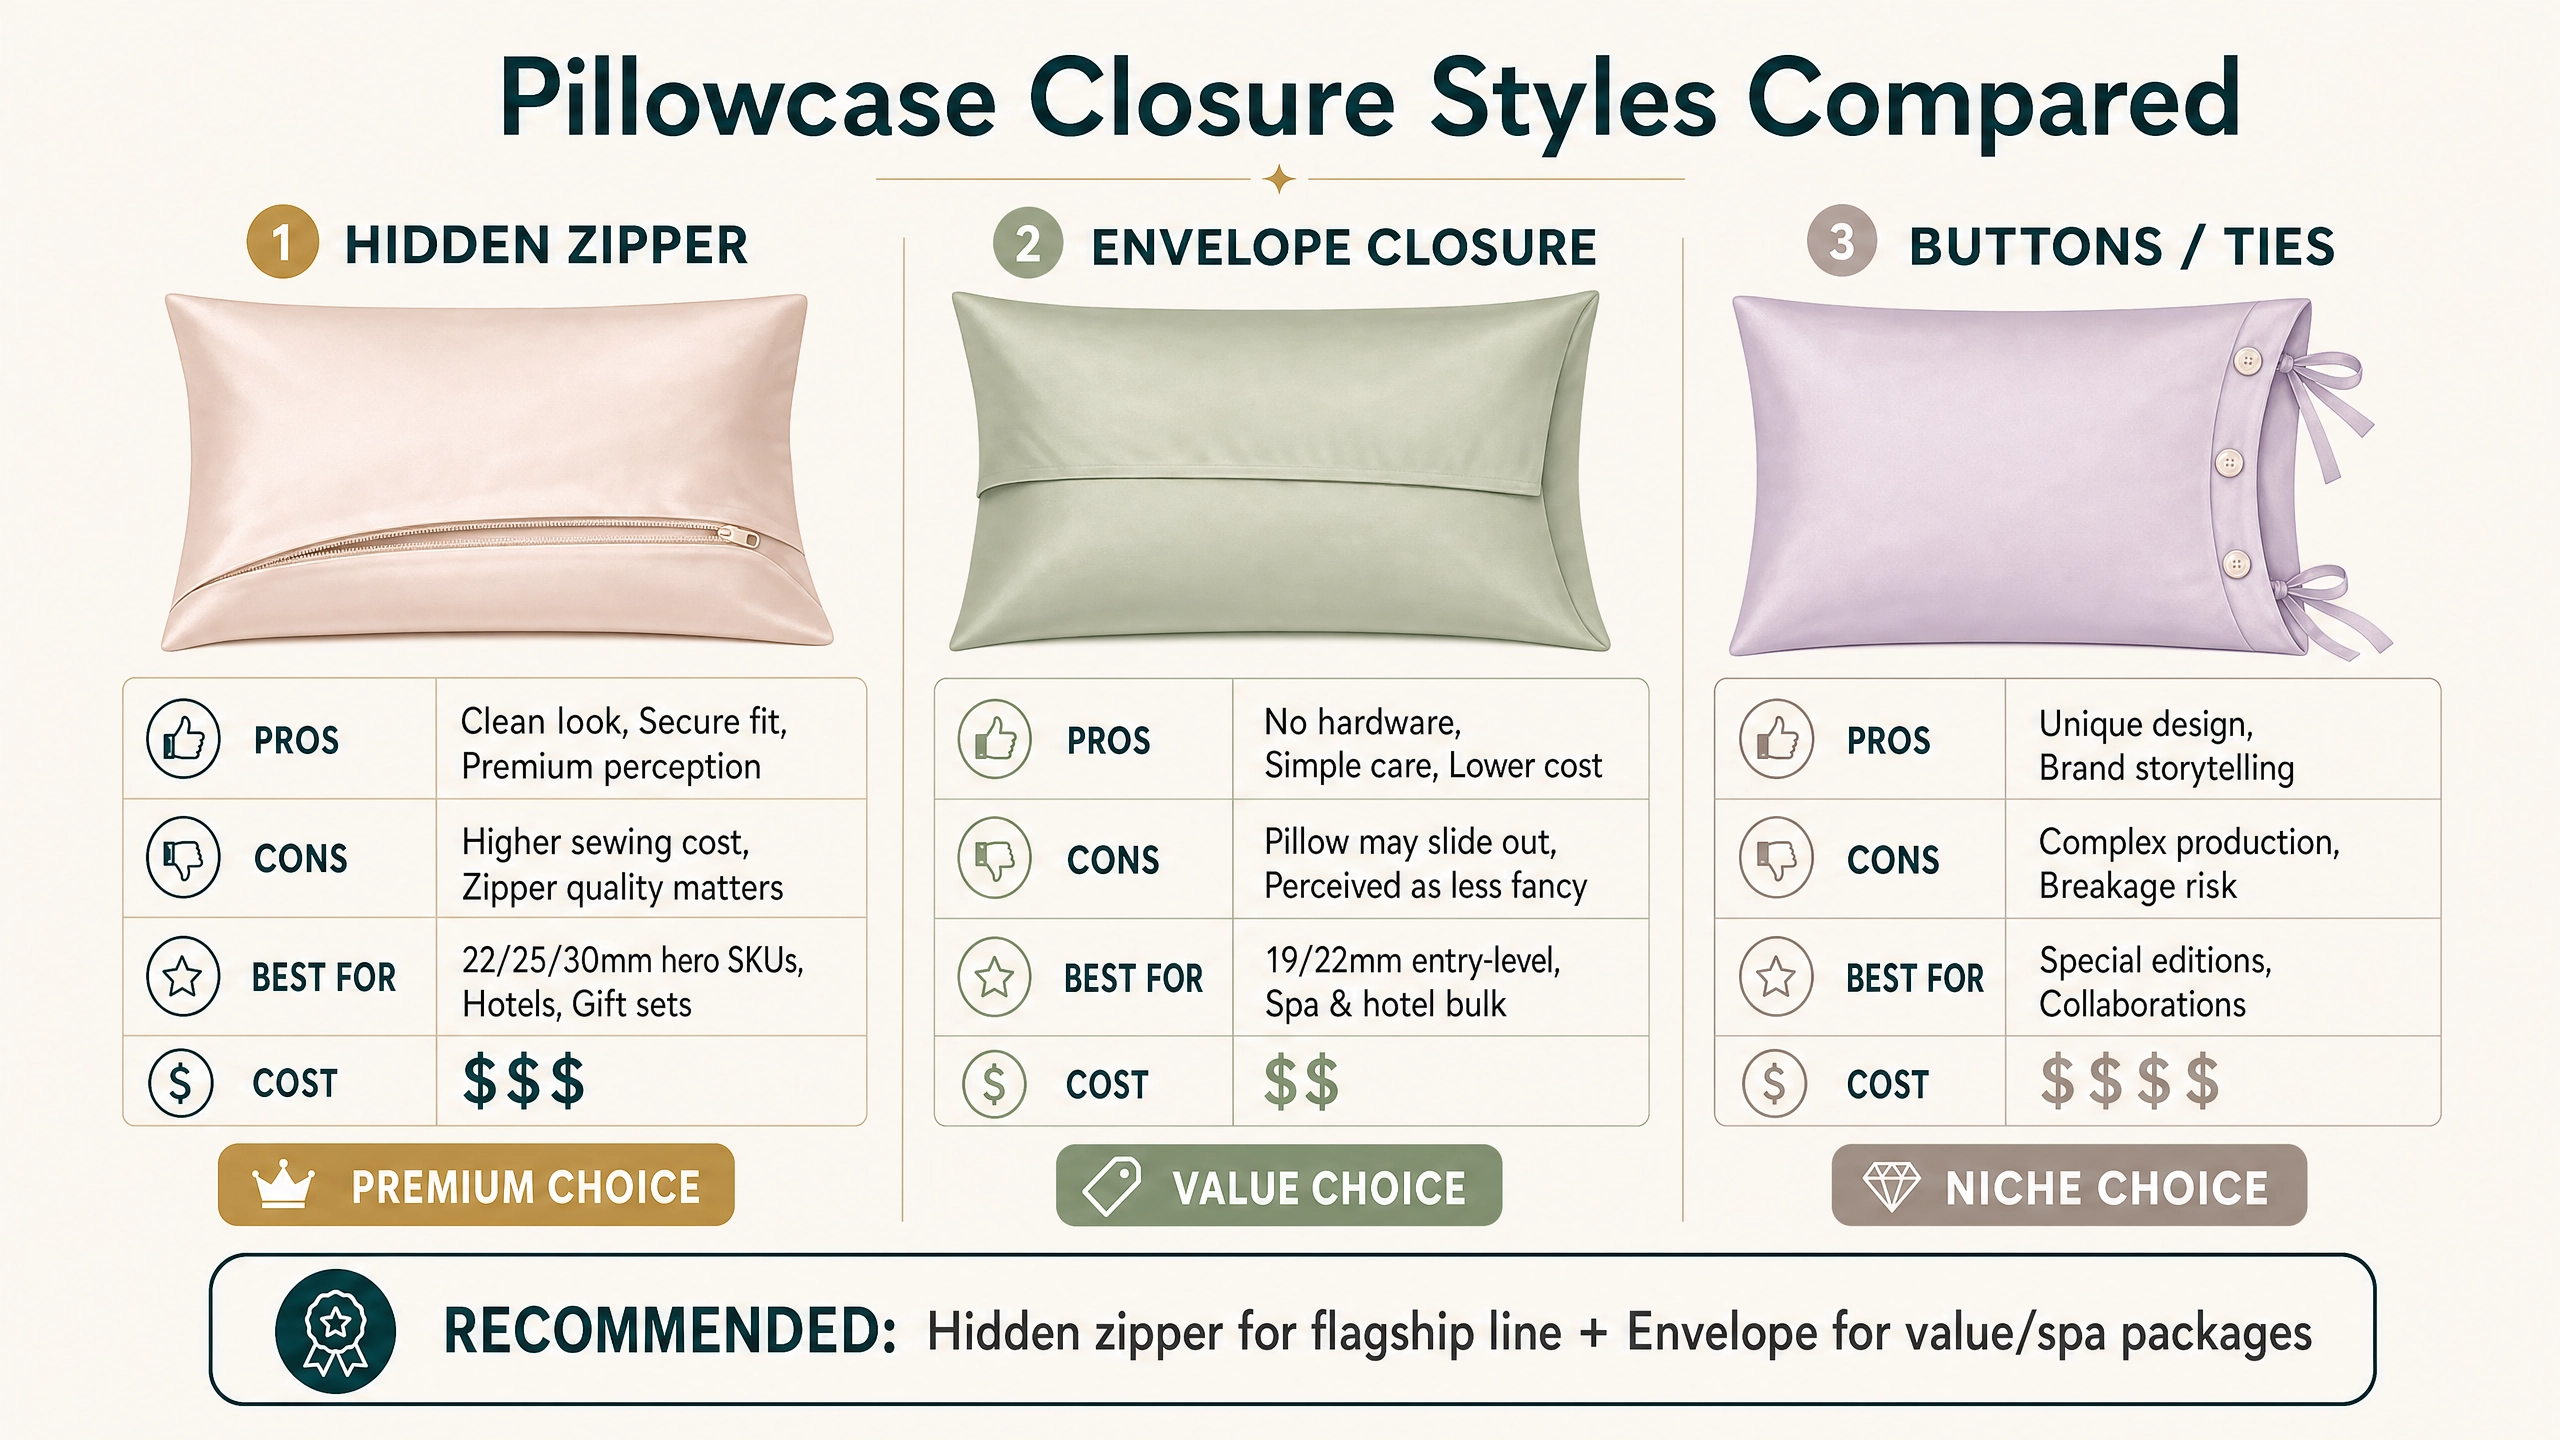
Why Envelope Style Works Best for Beginners
| Feature | Envelope Style | Zipper | Velcro |
|---|---|---|---|
| Difficulty | Beginner | Intermediate | Beginner |
| Hardware | None | Zipper + slider | Velcro tape |
| Time | 10–15 minutes | 20–30 minutes | 15–20 minutes |
| Look | Invisible back | Visible line | Visible seam |
| Best For | Kids, pets, frequent washing | Formal decor | Functional needs |
Envelope closures win on speed, cost, and safety. There are no small parts to break, choke on, or scratch furniture.
Save Money Without Sacrificing Style
DIY vs. Store-Bought Pillow Covers
- DIY cost: Roughly $5 to $15 per cover (fabric + thread)
- Retail price: $20 to $60+ for a single designer cover
- Savings: Up to 75%, especially when using drop cloth or remnants
One yard of fabric typically yields two to four covers depending on size. That means a full set for your sofa costs less than a single store-bought pillow.
Frequently Asked Questions About Making Toss Pillow Covers
What fabric is easiest for beginners to use?
Quilting-weight cotton is the most beginner-friendly option. It doesn’t slip while sewing, presses cleanly, and holds its shape after repeated washing. Avoid silk, rayon, or lightweight polyester until you’ve practiced a few times.
How much fabric do I need for one pillow cover?
One yard of 44-inch wide fabric is enough for two 18-inch or 20-inch covers. For larger 24-inch pillows, plan on one yard per cover. Always buy a little extra to account for pattern matching or cutting errors.
Can I make pillow covers without a sewing machine?
Yes. Hand-sewing works, though it takes longer. Use a sturdy backstitch along all seams and hems. A thimble helps push the needle through multiple layers of fabric comfortably.
How do I keep the pillow insert from sliding out?
Make sure your back panels overlap by at least 3 to 5 inches. After inserting the pillow, adjust the overlap so the flaps sit flat against each other. Tuck the insert corners fully into the cover for a snug fit.
What seam allowance should I use for envelope pillow covers?
A ½-inch seam allowance works best for the side seams. For hems, fold ½ inch twice and stitch close to the inner fold. Consistent seam allowances keep your corners square and your finished size accurate.
How do I wash my DIY pillow covers?
Turn the cover inside out, machine wash on a cold gentle cycle, and tumble dry low or line dry. Skip bleach and fabric softener to preserve prints and fabric integrity.
Key Takeaways for Making Toss Pillow Covers at Home
You now have a complete roadmap to make toss pillow covers that look custom and professional. Start with quilting cotton, use the one-piece formula for fastest results, and press every fold before stitching. Hem the short ends, overlap the back panels by at least 5 inches, and sew with a consistent ½-inch seam allowance. Trim your corners, turn the cover right side out, and press for a crisp finish.
Grab your fabric, cut your first rectangle, and sew along. In less time than it takes to watch a single TV episode, you’ll have a fresh, custom pillow cover ready to style. Your couch (and your wallet) will thank you.