How to Make a Neck Pillow: Easy DIY Guide
Neck pain from long hours at a desk, restless travel, or poor posture is all too common, but you don’t need an expensive solution. With basic materials and under an hour, you can make a neck pillow perfectly tailored to your comfort needs. This guide covers everything from fabric selection to finishing techniques, whether you want a soft travel pillow, a soothing heated rice version, or a therapeutic bow-tie support.
You’ll learn how to choose the right materials, fill for comfort or heat therapy, and seal your pillow with a professional finish, even if you’re a beginner. From no-sew hacks to durable hand-stitched closures, each method is designed to be fast, functional, and customizable.
Choose Your Neck Pillow Style for Your Needs
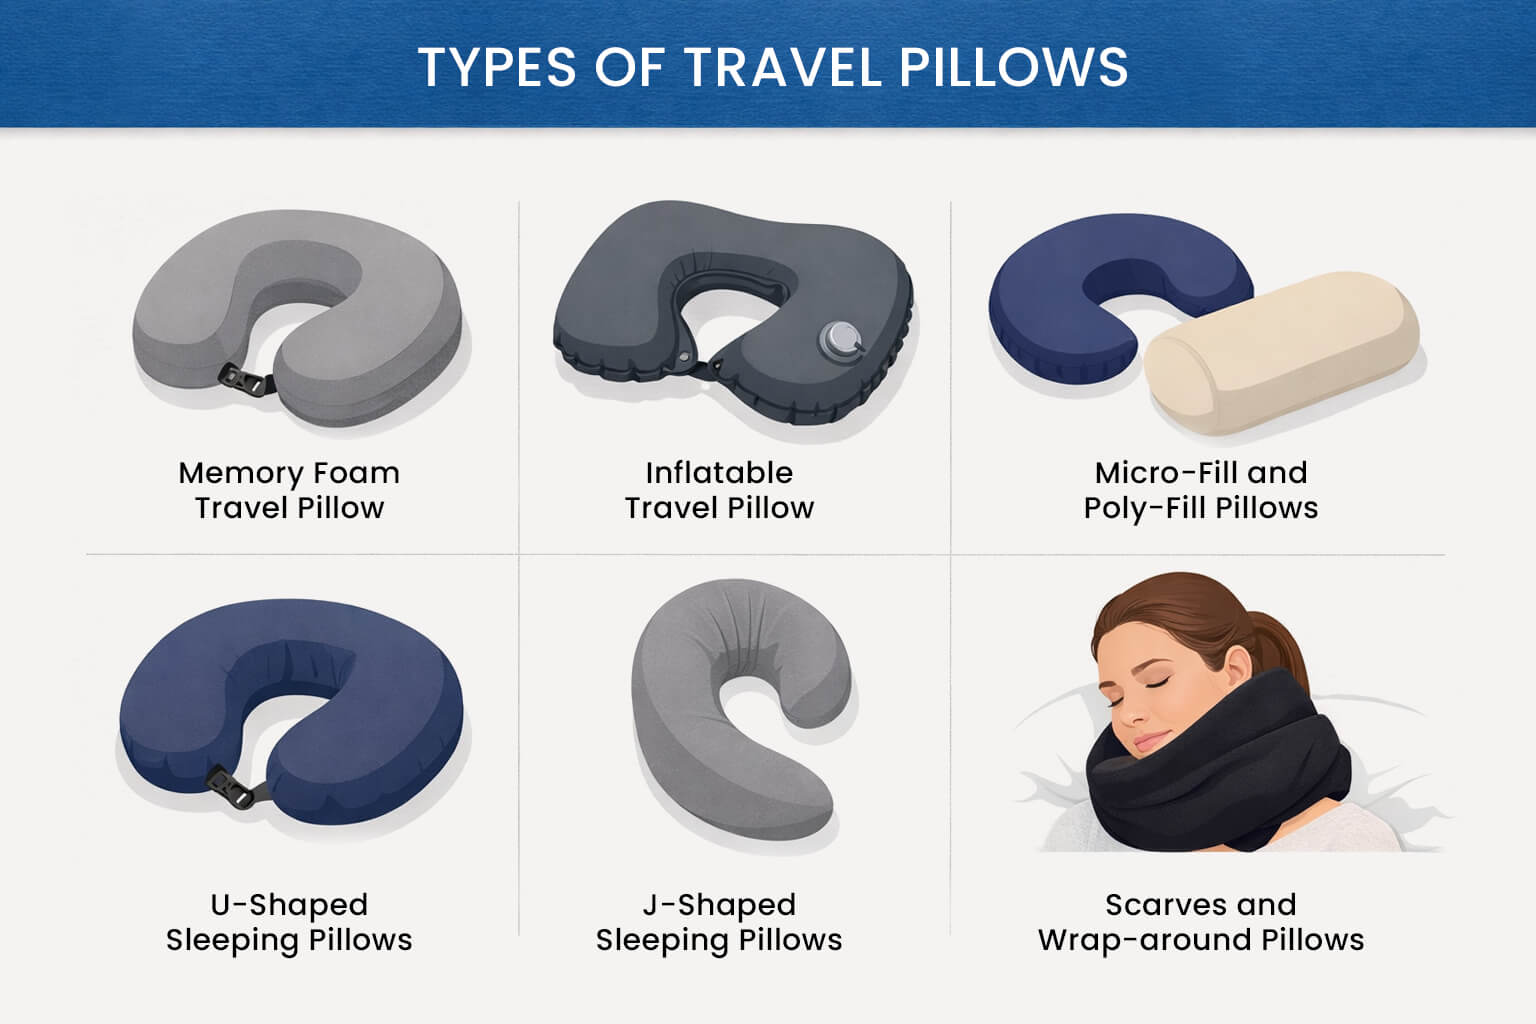
Not all neck pillows serve the same purpose. The best design depends on how and where you plan to use it.
Bow-Tie Therapeutic Pillow
This contoured “chubby triangle” shape cradles your head and supports both sides of the neck. It’s ideal for reading, watching TV, or working at a desk, preventing head drooping and promoting proper spinal alignment. Use soft fleece or cotton and fill with polyester fiberfill for machine-washable comfort.
C-Shaped Travel Pillow
The classic wrap-around design supports your chin and keeps your head upright during flights or long car rides. Fleece works best because it’s soft, doesn’t fray, and compresses easily. Sew two curved pieces together, leaving a gap to stuff with polyfill until firm but cozy.
Heated Rice Neck Pillow
Microwaveable versions deliver deep warmth to relax stiff muscles, ease migraines, or soothe arthritis. Fill a tightly woven cotton or terry cloth pillow with rice and dried lavender. Heat in 1-minute bursts for up to 4 minutes total.
No-Sew Emergency Option
Have no time or sewing supplies? Use a long sock or sweater sleeve. Fill with rice, tie or knot the end, and microwave for instant heat therapy. This works perfectly for beginners or last-minute relief.
Pick the Right Fabric for Comfort and Durability
Your fabric choice affects durability, comfort, and safety, especially for heated versions.
Fleece for Beginners
Ultra-soft and stretchy, fleece doesn’t fray and drapes well around the neck. Use half a yard of 58-inch wide cuddle fabric to make one pillow. Stretch should run horizontally across the neck for optimal fit. You don’t need to pre-wash fleece.
Cotton for Structure
Quilting cotton offers crisp edges and endless print options. It’s best for decorative or bow-tie styles. Pre-wash to prevent shrinkage, and use a 3/8-inch seam allowance. Handle carefully because cotton frays easily.
Terry Cloth for Heat Safety
Thick terry cloth acts as a heat buffer and prevents rice leakage. It’s ideal for microwaveable pillows. Choose tightly woven fabric to keep grains contained.
Repurposed Materials
Old t-shirts, bed sheets, or towels work well for eco-friendly or emergency projects. Ensure fabric is clean, tightly woven, and free of holes.
Select the Best Filling for Your Pillow Type

The filling determines comfort, weight, and function.
Polyester Fiberfill
Use 12.5 ounces (350 grams) of polyfill for travel or standard pillows. Fill until pleasingly plump, not too firm and not too soft. This material is machine washable and holds its shape after repeated use. Brands like Fairfield Polyfill perform well.
Rice for Heat Therapy
Rice provides grounding weight and retains heat beautifully. Use white or brown rice in microwaveable pillows. Fill only two-thirds of the internal volume to allow even heating and prevent bursting.
Dried Herbs for Aromatherapy
Add a quarter cup of lavender, lemongrass, or mint for aromatherapy benefits. Herbs must be fully dried to prevent mold. Bake lemongrass at low heat for 3 to 4 hours or air-dry lavender for 1 to 2 weeks.
Hybrid Fill: Rice and Polyfill
Combine half rice and half fiberfill for soft warmth with gentle support. This works well for users who want heat without excessive weight.
Pro Tip: Test fill your pillow before closing. Adjust firmness and distribution to match your comfort preferences.
Prepare and Cut Your Pattern Accurately
A well-cut pattern ensures symmetry and professional results.
Print at 100% Scale
Use landscape mode and verify size with the calibration line. Don’t scale the pattern.
Use Cardboard for Reuse
Transfer your printed pattern to stiff cardboard. This is ideal for batch-making or gifting multiple pillows.
Mark Key Notches
Center notches go 1/8 inch into the seam allowance at curve midpoints. Opening notches mark the stuffing gap on the top layer only. For bow-tie styles, V-clip centers align precise stitching points.
Avoid distortion: Place the stuffing opening on a straight edge, not a curve.
Sew the Pillow Body with Precision
Match notches and reinforce stress points for durability.
For C-Shaped Travel Pillow
Pin two pieces right sides together and align center notches. Sew a 3/8-inch seam around the edge, skipping 3 to 5 inches between opening notches. Back-tack at notches for strength.
For Bow-Tie Pillow
Sew two pieces together from V-clip to V-clip. Attach 12-inch ribbon loops to the third piece at V-centers, sandwiching loops between layers. Sew remaining sides, leaving a 3 to 4-inch gap on the inner curve.
Use fabric clips instead of pins on fleece to avoid snags. A walking foot helps prevent shifting on slippery fabrics.
Clip and Trim Curves for Smooth Turning
Smooth curves require careful trimming to prevent bulk and puckering.
Convex Curves (Outward Bulge)
Trim excess fabric to reduce bulk and allow the seam to lay flat.
Concave Curves (Inward Dip)
Clip small notches every half to 1 inch into the seam allowance without cutting the stitch line. This allows the fabric to turn right side out smoothly.
Turn, Press, and Shape Your Pillow
A sharp point turner makes all the difference for professional results.
How to Turn
Gently pull fabric through the opening. Use a chopstick, knitting needle, or turning tool to push out corners and curves completely. Ensure no fabric is trapped inside before proceeding.
Press for a Polished Look
Use low heat and place a pressing cloth over synthetic fabrics. Do not melt fleece or polyester. Press seams flat and fold raw edges of the opening inward.
Stuff to Your Preferred Firmness
Fill evenly for balanced support and comfort.
Step-by-Step Stuffing
Begin inserting fill through the opening and work from ends toward center. Distribute rice or polyfill evenly, avoiding lumps and soft spots. Test firmness during filling: soft for relaxation, firm for support.
For hybrid fill: Layer rice at the bottom and polyfill on top for comfort.
Close the Opening Seamlessly
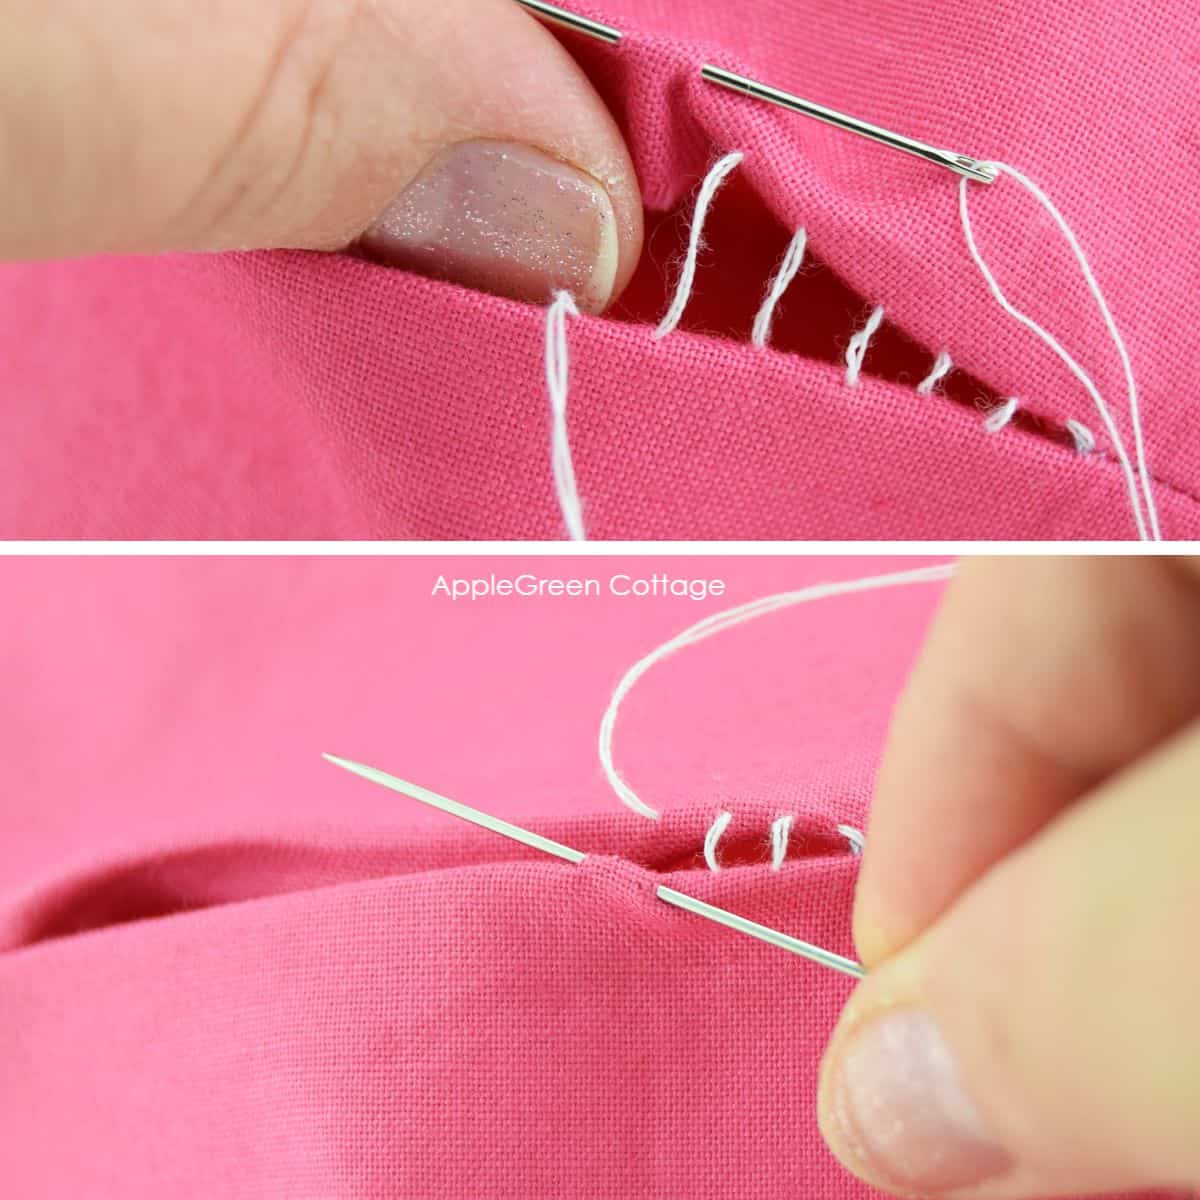
An invisible closure elevates your pillow from homemade to professional.
Ladder Stitch Method
Thread a needle with double thread about 12 inches long and knot the end. Insert through the folded edge and emerge at the seam line. Cross to the opposite side and take an 1/8-inch stitch. Repeat, forming a ladder pattern. Pull tight every 1 to 2 inches and finish with an internal knot and 2 to 3 backstitches.
For fleece: A whip stitch is faster and hides well in the fibers.
Care for Your DIY Neck Pillow
Keep your neck pillow fresh and safe with proper maintenance.
Machine-Washable Pillows
Wash polyfill pillows in cool water on a gentle cycle. Tumble dry low with a bath towel to reduce stress on the seams.
Heated Rice Versions
Surface wipe only with a damp cloth and air dry in sunlight. Never submerge the pillow because rice will clump or mold.
No-Sew Options
Spot clean sock or sleeve versions and replace fill if it becomes damp or odorous.
Refresh scent: Replace dried herbs every 6 to 12 months.
Microwave Safety Guidelines for Heated Pillows
Rice pillows can overheat, so follow these rules carefully.
Heating Instructions
Heat in 1-minute increments, removing and shaking well between each minute. Maximum total time is 3 to 4 minutes. Always test temperature before use and never leave unattended.
Fire risk: Overheating can scorch or ignite rice. Let the pillow cool completely between uses.
Troubleshoot Common Sewing Problems
Fix issues before they ruin your pillow.
Lopsided Shape
This usually stems from uneven seam allowance. Measure consistently and pin thoroughly throughout sewing.
Gaps at Curves
Inadequate clipping causes gaps when turning. Clip concave curves before turning right side out.
Filler Poking Out
Large stitches or a wide gap allow filler to escape. Use tiny hand stitches and don’t overstuff.
Rice Leakage
A loose weave or weak seam lets rice escape. Double-stitch seams and use tight fabric like terry cloth.
Frequently Asked Questions About Making a Neck Pillow
What is the easiest neck pillow to make for beginners?
The C-shaped travel pillow made from fleece is the easiest for beginners. Fleece doesn’t fray, drapes well, and requires minimal pressing. You can complete it in under an hour with basic sewing skills.
How much fabric do I need to make a neck pillow?
Half a yard of 58-inch wide fabric makes one standard neck pillow. If using 44-inch wide fabric or fussy-cutting large motifs, you may need three-quarters to 1 yard.
Can I make a neck pillow without sewing?
Yes. Use a long sock or sweater sleeve, fill with rice, and tie or knot the end. This no-sew option works for instant heat therapy and requires zero tools.
How long does a rice neck pillow stay warm?
Rice-filled pillows retain warmth for 20 to 30 minutes after microwaving. The exact time depends on your microwave power and how well the pillow is insulated.
Is it safe to wash a heated rice pillow?
No. Never submerge or machine wash a rice-filled pillow because the rice will clump or mold. Surface wipe only with a damp cloth and air dry in sunlight.
How do I stop rice from leaking out of my pillow?
Use tightly woven fabric like terry cloth and double-stitch all seams. Fill only two-thirds full to reduce pressure on the seams during heating.
Key Takeaways for Making Your Own Neck Pillow
Making a neck pillow isn’t just a craft project, it’s a practical solution to everyday discomfort. Whether you need support at your desk, relief from muscle tension, or a thoughtful handmade gift, this project delivers. Choose fleece for travel pillows, cotton for structured support, and terry cloth for heated versions. Fill with polyfill for machine-washable comfort or rice for heat therapy. The construction process takes under an hour for beginners and under 30 minutes for experienced sewers. With clear steps, smart material choices, and pro techniques, your DIY neck pillow will outperform store-bought versions in comfort, cost, and personalization. Start today: grab some fabric, pick your filling, and make a neck pillow that fits your life perfectly.