How to Make a Crochet Pillow Cover
Store-bought decorative pillows often cost $30 to $60, and the designs can feel generic. The good news? You can craft a custom crochet pillow cover for under $10 in materials and just a few hours of work. Learning how to make a crochet pillow cover puts you in control of every detail, from yarn color to stitch texture to final size.
This guide covers everything you need: choosing yarn and hooks, calculating perfect sizing with gauge, mastering key stitches, and finishing your cover using two reliable construction methods. You’ll also find tips for embellishments, troubleshooting, and long-term care.
Choose the Right Yarn and Hook
Pick Washable, Durable Fibers
Acrylic and cotton yarns are the top choices for pillow covers because they are machine washable and resist pilling. Acrylic is budget-friendly and comes in endless colors. Cotton offers a crisp drape that holds stitches sharply. Wool adds warmth but usually requires spot cleaning, so save it for decorative pieces.
For most projects, #4 worsted weight or bulky weight yarns (weight 5 or 6) work best. Super bulky options like Bernat Blanket or Wool-Ease Thick & Quick let you finish a cover in just a few hours.
Match Hook Size to Yarn Weight
Using the correct hook prevents loose or tight fabric. Here is a quick reference:
- DK weight (3): 3.75mm hook
- Worsted weight (4): 4.50mm to 5.50mm
- Chunky (5): 6mm
- Super bulky (6): 8mm
Always check your pattern’s recommendation, but keep a set of hooks on hand. Tulip Etimo or aluminum hooks provide smooth stitching and consistent tension.
Calculate Size Using Gauge

Make a Swatch First
Skipping gauge is the number one reason homemade covers do not fit. Before starting, crochet a 4″x4″ swatch using your chosen yarn, hook, and stitch pattern. Count how many stitches and rows fit in one inch.
Example: If your swatch has 14 stitches over 4 inches, you have 3.5 stitches per inch. If it has 16 rows over 4 inches, that is 4 rows per inch.
Use Math to Customize Any Size
Need a cover for a 16″x16″ pillow? Multiply:
- Stitches needed = 16 inches × 3.5 sts/inch = 56 stitches
- Rows needed = 16 inches × 4 rows/inch = 64 rows
Adjust for stitch multiples. The Alpine stitch requires a multiple of 2 + 1 (odd number). If your math gives 52.5, round up to 53 stitches to keep the pattern aligned. Crochet’s natural stretch allows slight variance, so do not stress over being exact.
Master Key Crochet Stitches
Learn Foundation Stitches
Every pillow starts with basic stitches. Know these before beginning:
- Chain (ch): Foundation for starting rows.
- Single crochet (sc): Dense and durable, ideal for sturdy covers.
- Half double crochet (hdc): Slightly looser, faster to work.
- Extended single crochet (esc): Taller than sc, creates a squishy, tight fabric.
To work esc: insert hook, pull up a loop, insert hook in the stitch below, pull up a loop, yarn over, and pull through all loops. This stitch adds depth without bulk.
Try Textured Patterns
For visual interest, use advanced stitches:
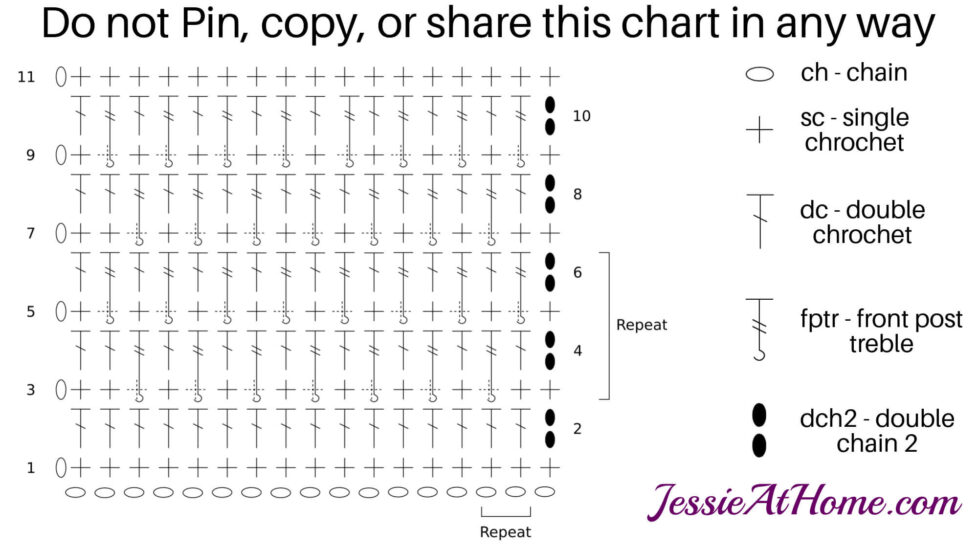
- Alpine stitch: Combines double crochet and front post triple crochet (FPtr) for a ribbed, 3D look.
- Bobble stitch: Adds raised clusters for a modern, tactile surface.
- Granny squares: Modular design option that joins multiple squares for color play.
Alpine stitch tip: Start with a foundation double crochet (Fdc) row. Then alternate: DC, FPtr around next stitch, DC, and repeat across.
Build the Cover: Envelope Method
Crochet a Single Rectangular Panel
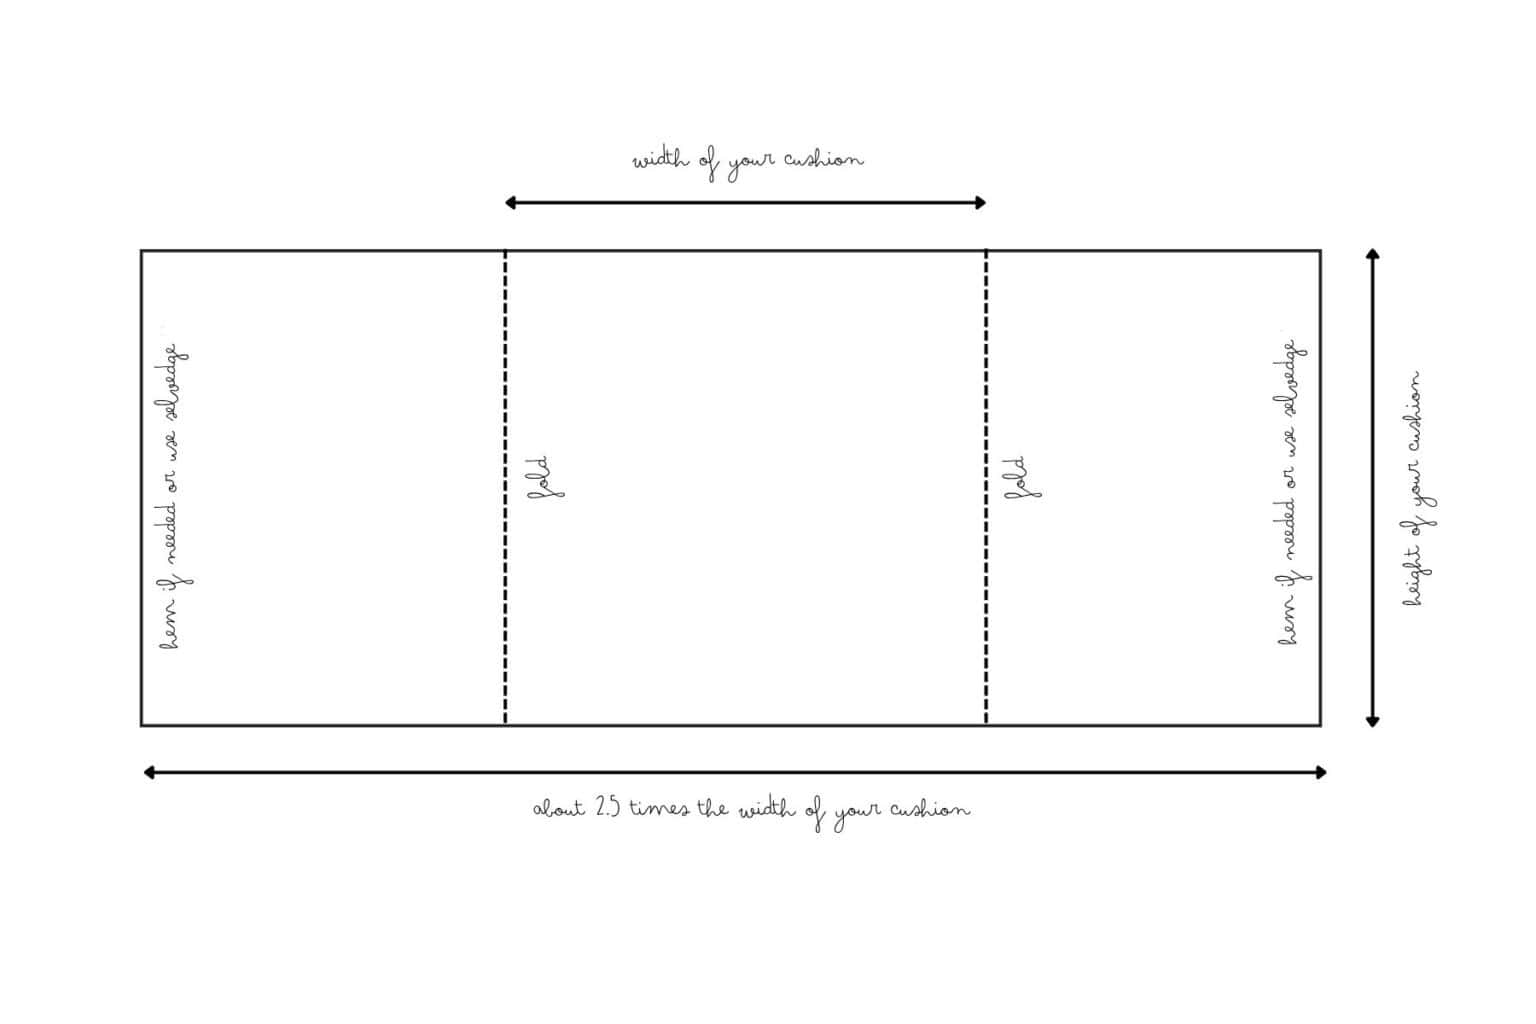
This method skips sewing the final seam, creating a slip-in cover.
- Chain to pillow width (e.g., 32 for a 16″ pillow).
- Work hdc in back loop only (BLO) across every row.
- Continue until length equals pillow width plus 2 to 3 inches for overlap.
BLO creates ribbing that stretches, making it easy to slide the pillow in and out.
Fold and Seam the Sides
Once the panel is long enough:
- Fold in half with wrong sides facing out.
- Align edges and use a yarn needle to whip stitch both open sides.
- Weave in all ends.
Turn right-side out and insert the pillow form through the open envelope flap. Add button closures by chaining a loop on one flap and sewing a button on the other.
Build the Cover: Two-Panel Method
Crochet Matching Front and Back Panels
This method is ideal for textured or colorwork designs.
- Crochet the first panel to exact pillow size using your gauge math.
- Repeat for the second panel.
- Lay them together with wrong sides facing in.
This ensures the right sides show when finished.
Join With Slip Stitch or Border
Option 1: Invisible Slip Stitch Seam
With a yarn needle, slip stitch around three sides, leaving one short side open. Insert the pillow, then close the final side with slip stitches.
Option 2: Reinforced Single Crochet Border
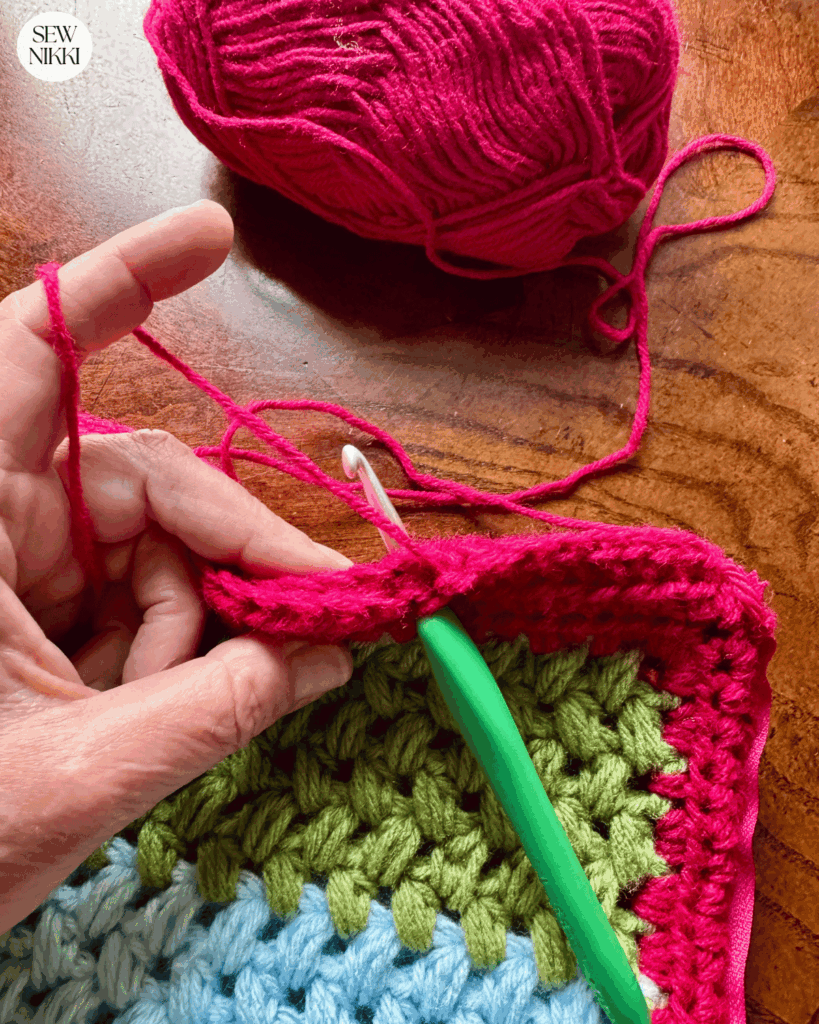
Attach yarn and sc evenly around all four sides. At each corner, place 3 sc in one stitch to prevent pulling. Repeat for 2 to 3 rounds for a clean, finished edge. In round 2, increase in the middle sc of the corner cluster (the 2nd of the 3 sc) to keep edges flat.
Add Decorative Touches
Attach Fringe or Tassels
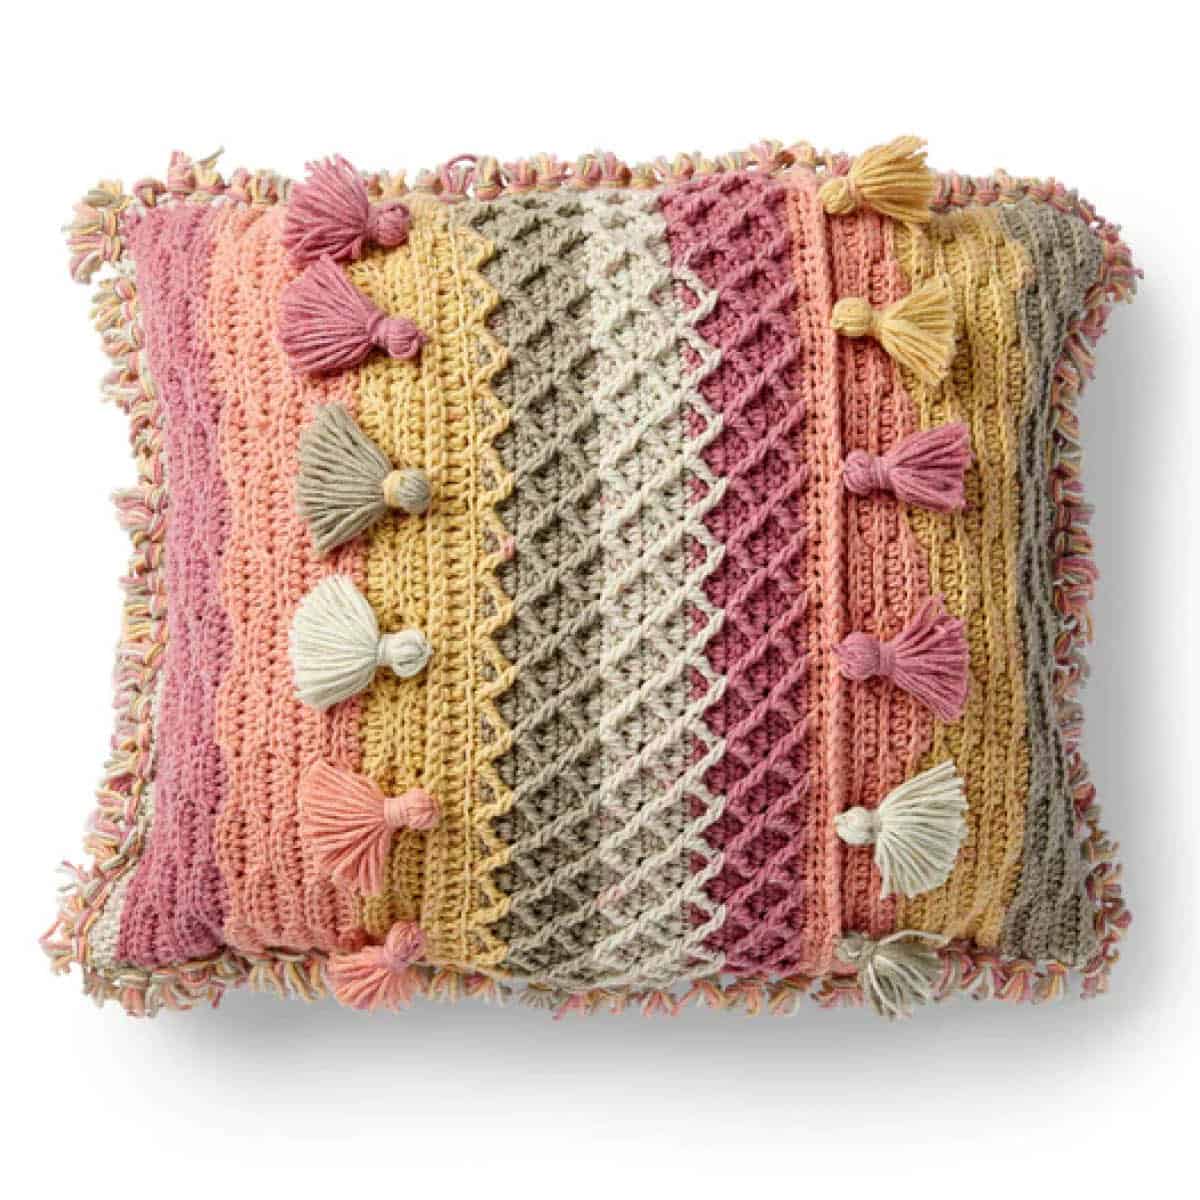
For boho flair, add tassels to corners:
- Cut 8 to 10 strands of yarn (10 to 12 inches long).
- Fold in half, pull loop through corner stitch.
- Pass ends through loop and tighten.
- Trim evenly.
For a fringe alternative, chain 15 to 20 from each corner and fasten off for a soft, flowing edge.
Embellish With Surface Details
- Pom poms: Sew to corners or scatter across the front.
- Surface crochet: Crochet stars, hearts, or initials directly onto the panel.
- Color blocking: Use contrasting yarn for a border or center panel. Match gauge so panels lie flat.
Fix Common Mistakes

Prevent Skewed Squares
If your square looks like a rhombus, you are likely skipping or adding stitches at row ends.
Count stitches every 2 to 3 rows. Mark the first and last stitch with stitch markers. Insert your hook into the correct loop, always the top two loops unless the pattern specifies otherwise.
Correct Gauge Issues
If your cover is too small, go up a hook size. Too big? Switch to a smaller hook. Always re-swatch after changing tools. Measure after 10 rows to catch problems early.
Hide Uneven Seams
Whip stitching with matching yarn blends seams into the fabric. If your join is bumpy, cover it with a single crochet border. It hides flaws and strengthens edges.
Maintain and Wash Your Cover
Follow Fiber Care Rules
- Acrylic and cotton: Machine wash cold on a gentle cycle. Tumble dry low or lay flat.
- Wool or blends: Hand wash in cool water and lay flat to dry. Avoid agitation to prevent felting.
Never wring or twist. Press out water gently instead.
Extend Lifespan
- Rotate pillows weekly to prevent one-sided wear.
- Spot clean spills immediately with mild soap and a damp cloth.
- Store in a dry place and avoid plastic bags to prevent moisture buildup.
With proper care, a handmade cover can last years, often longer than store-bought versions.
Save Time and Money
Why DIY Beats Buying
A ready-made decorative pillow can cost $30 to $60. A crochet cover uses under $10 in yarn (about 300 to 450g for bulky yarn) and takes just a few hours for beginners.
You also avoid cheap materials and loose stitching found in mass-market items. Plus, you can reuse the cover by simply removing the pillow form for washing.
Customize for Any Pillow
Got an odd-sized throw pillow from a thrift store? Use the gauge formula to make a perfect-fit cover. This method works for rectangles, circles, or lumbar shapes. Just adjust the math.
Frequently Asked Questions About Crochet Pillow Covers
What is the best yarn for a crochet pillow cover?
Acrylic and cotton yarns are best because they are machine washable, resist pilling, and maintain their shape. Worsted weight (#4) and bulky weight (#5 or #6) yarns are the most common choices for sturdy, quick-finishing projects.
How do I calculate the right size for my pillow cover?
Crochet a 4″x4″ swatch first, then count stitches and rows per inch. Multiply your pillow’s dimensions by those numbers to get your total stitch and row counts. Adjust for stitch multiples if your pattern requires them.
Can beginners make a crochet pillow cover?
Yes. Patterns using basic stitches like single crochet, half double crochet, and chain are beginner-friendly. The envelope method is especially simple because it requires seaming only two sides.
What is the difference between the envelope method and the two-panel method?
The envelope method uses one folded rectangle with an overlapping opening, so no final seam is needed. The two-panel method creates two separate squares or rectangles that are seamed together on three or four sides. The envelope method is faster, while the two-panel method allows for more design variation.
How much yarn do I need for a 16″x16″ pillow cover?
A standard 16″x16″ pillow using bulky yarn requires approximately 450g (300m) of yarn. Lighter weight yarns may need more yardage depending on the stitch pattern.
How do I wash a crochet pillow cover?
Acrylic and cotton covers can be machine washed cold on a gentle cycle and tumble dried low. Wool covers should be hand washed in cool water and laid flat to dry. Always avoid wringing or twisting.
Key Takeaways for Making Your Own Crochet Pillow Cover
Making a crochet pillow cover is simple, affordable, and deeply satisfying. Start with the envelope method and basic stitches like single crochet or half double crochet. Always swatch first and calculate your gauge to ensure a perfect fit. Choose washable acrylic or cotton yarn for easy care, and finish with clean seams using whip stitch or a single crochet border.
Ready to start? Grab your hook, pick your yarn, and begin your swatch. Your coziest handmade home upgrade is just a few stitches away.