How to Attach Piping to a Pillow
You’ve finished sewing your pillow cover, only to find the edges look flat and homemade. Piping changes everything. This simple addition transforms plain cushions into polished, tailored accents that rival high-end décor. The technique looks intimidating, but it comes down to smart prep, the right tools, and careful stitching.
In this guide, you’ll learn how to attach piping to a pillow from start to finish. We’ll cover measuring and cutting bias strips, encasing the cord, mastering sharp corners, and joining ends seamlessly. By the end, you’ll have the confidence to add crisp, durable edges to any pillow project.
Gather Essential Tools and Materials
Before cutting any fabric, set yourself up for success with the right equipment. Using proper tools makes the process smoother and dramatically improves your results.
Choose the Right Sewing Machine Foot
A standard presser foot won’t cut it when sewing close to thick cording. You need specialized feet to navigate the bulk:
- Zipper Foot: Allows the needle to stitch right next to the cord without hitting it
- Bulky Overlock Foot: Ideal for thick fabrics and heavy piping
- Narrow Base Foot: A precision alternative for tight control
Attach the zipper foot for most steps. It’s essential for getting stitches as close to the piping as possible.
Select Fabric and Cord
Choose medium- to heavyweight fabrics like cotton, linen, or upholstery weight for best results. Avoid stretchy or flimsy materials unless stabilized.
- Filler Cord: Use 3/8″ or 1/2″ welting cord for pillows. Stiff cotton or polyester cords hold shape better
- Thread: Match or contrast with your fabric for desired effect
- Bias Tape: Pre-made wide bias tape can wrap around cording if it allows for a ½” seam
Pre-wash all fabric and cord if the finished pillow will be washed. This prevents post-sewing shrinkage and puckering.
Measure and Cut Piping Accurately
Miscalculating length or width is a common reason piping projects fail. Follow this method to get it right the first time.
Calculate Total Piping Length
For an 18″ square pillow:
- Multiply side length by 4: 18″ × 4 = 72″
- Add 4–5″ for overlap and corners: 72″ + 4″ = 76″
- Divide by 36 to convert to yards: 76 ÷ 36 = 2.11 → Buy 2¼ yards of cord
Always round up to avoid running short mid-project.
Cut Correctly Sized Bias Strips
Use bias-cut fabric for flexibility, especially at corners.
- Strip Width Formula: (Cord Circumference × 2) + (Seam Allowance × 2)
- For a ½” cord with ½” seam allowance: (½” × 2) + (½” × 2) = 2″ wide strips
To determine how much fabric to cut:
- Multiply total length by strip width: 76″ × 2″ = 152 sq in
- Take square root: √152 ≈ 12.3 → Round up to 13″
- Add 3″ for joining seams: 13″ + 3″ = 16″
- Cut a 16″ x 16″ square of fabric
This yields enough bias strips for your piping project.
Cut and Join Bias Strips
Bias-cut strips give your piping the flexibility to bend smoothly around corners without kinking.
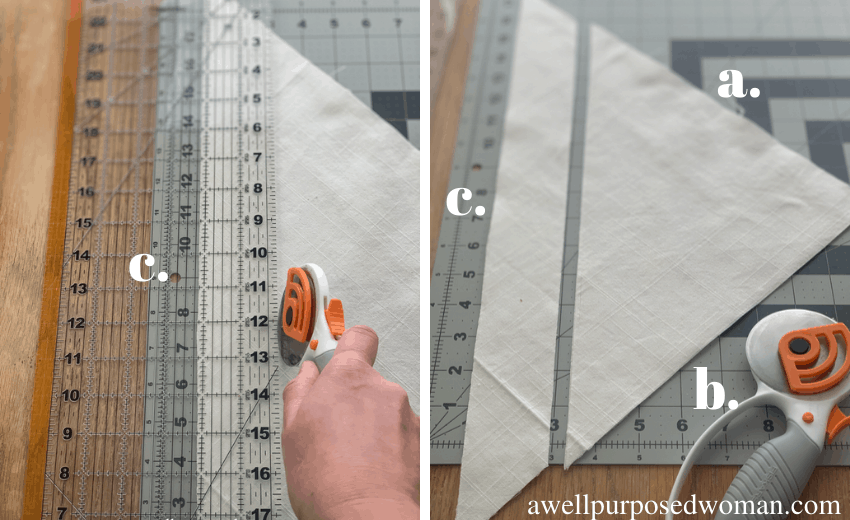
Cut on the 45-Degree Angle
- Fold fabric diagonally so the selvage aligns with the cut edge
- Press to create a crease
- Cut 2″-wide strips parallel to the fold
Bias strips stretch slightly, allowing them to conform to curves with ease.
Join Strips Seamlessly
When one strip isn’t long enough:
- Place two strips at right angles, right sides together
- Draw a diagonal line from top left to bottom right
- Sew along the line
- Trim seam to ¼”, press open, and trim dog ears
- Repeat until full length is achieved
Press the joined strip lightly before wrapping around the cord.
Wrap and Stitch the Piping

Now encase the cord in fabric to create the finished piping.
Center Cord in Fabric Strip
- Lay the fabric strip wrong side up
- Place the filler cord in the center
- Fold both long edges over the cord so raw edges meet at the bottom (this forms the “flange”)
- Pin frequently to hold everything in place
Sew Close to the Cord
- Attach a zipper foot
- Position the needle to stitch as close as possible to the cord without piercing it
- Sew slowly, guiding the cord with your fingers to prevent twisting
- Leave 2–3″ of excess at both ends
Stitching too far from the cord creates a loose, wobbly seam. Stay tight to the “lump” for a clean look.
Attach Piping to Pillow Front
This is where most mistakes happen, including shifting, bubbling, or misaligned seams. Prevent them with smart preparation.
Start in the Middle of a Side
Begin on the bottom edge, not at a corner. This helps distribute tension evenly.
- Align raw edge of piping flange with raw edge of pillow front (right side down)
- Pin every 2–3 inches
- Baste with a long stitch length (4.0) using ½” seam allowance
Basting locks the piping in place before final sewing. Skip this step at your peril.
Use a Zipper Foot for Precision
Switch back to the zipper foot for final stitching.
- Keep the piping to the left of the needle
- Adjust needle position all the way left to stitch right next to the cord
- Go slowly at corners
Navigate Corners Smoothly
Sharp corners are the hallmark of professional work. Avoid bulk and puckering with these steps.
Clip Flange Before Turning
As you approach a corner (about ½” away):
- Stop sewing
- Leave needle down, lift foot, pivot fabric slightly
- Make 3–5 small snips into the flange, up to but not through the stitching line
- Fold piping diagonally across the corner
- Resume sewing down the next side
Clipping allows the fabric to spread without adding bulk.
Avoid Rounded Edges
Keep consistent seam allowance throughout. If the piping pulls or bunches, re-pin and re-baste. Misalignment here ruins the final shape.
Join Piping Ends Cleanly
Two methods exist: simple overlap and continuous join. For invisible results, use the professional method.
Overlap Method (Beginner-Friendly)
- When nearing the start, cross the end tail over the beginning tail
- Sew over the overlap
- After assembly, trim excess even with the seam
This method is fast but slightly bulkier.
Continuous Join (Pro Finish)
- Stop 2″ from start
- Use a seam ripper to open the starting end’s stitching
- Pull back fabric to expose cord
- Cut cord ends to butt together exactly
- Fold under raw edge of finishing tail by ½”
- Wrap fabric around joined cord, overlapping starting end
- Pin and sew final section
This creates a seamless circle with no lump.
Assemble the Pillow Cover
Now sandwich the piping between the front and back pieces.
Layer Pieces Correctly
- Place back panel(s) on front, right sides together
- For envelope backs: Hem inner edges first, then center overlap
- Align all corners precisely, as piping may distort the shape
Straighten the front piece before pinning.
Pin Thoroughly
Use clips or pins every 2–3 inches. Pay extra attention to corners and piping areas to prevent shifting.
Sew with Zipper Foot Again
- Use the zipper foot
- Stitch just inside the original piping seam, feeling for the cord edge with your fingers
- Use regular stitch length (2.5)
- Backstitch at start and end for strength
Trim Corners and Excess
- Trim corners diagonally to reduce bulk
- Trim any excess piping even with the edge
- Clip curves if needed (small “V” cuts up to stitching line)
Do not cut the stitching, as this weakens the seam.
Finish and Shape the Pillow
The final touches make all the difference in appearance and durability.
Turn Right Side Out
- Remove all pins
- Turn cover through the opening
- Use a chopstick or point turner to push out corners gently
Work slowly to avoid poking holes.
Pop the Piping
Massage the seam with your fingers to help the piping “pop” out from the edge. A well-attached cord should create a defined ridge.
Press for Crisp Edges
Iron the cover lightly, focusing on seams and corners.
- Use steam if fabric allows
- Avoid pressing directly on piping. Iron beside it to maintain volume
Close the Opening
For non-zippered pillows:
- Insert pillow form (down or down-alternative inserts work best)
- Hand-stitch opening closed using ladder stitch
- Pull tight to close the invisible gap
For zippered versions, insert the zipper before final assembly or use an invisible zipper foot.
Troubleshoot Common Issues
Even experienced sewers face challenges. Here’s how to fix them fast.
Piping Shifts During Sewing
- Cause: No basting or insufficient pins
- Fix: Always baste first. Use clips instead of pins if they snag
Cord Twists Inside Fabric
- Cause: Uneven tension or poor handling
- Fix: Roll cord between fingers as you sew. Pause and straighten if it kinks
Corners Are Bulky or Rounded
- Cause: Not clipping flange or trimming corners
- Fix: Clip flange at 45° before turning. Trim seam allowance at corners
Needle Hits the Cord
- Cause: Wrong foot or needle position
- Fix: Use zipper foot and move needle to far left. Sew slowly
Wavy or Ruffled Curves
- Cause: Fabric too tight or not clipped
- Fix: Clip small “V” shapes into seam allowance up to stitching line
Upgrade with Pro Techniques

Take your pillows from good to gallery-worthy with these advanced tips.
Use Contrasting or Matching Piping
- Contrasting: Adds bold definition, great for modern décor
- Matching: Creates subtle, tailored look, ideal for formal spaces
Try Faux (Flat) Piping
No cord? Use folded bias tape as flat piping for lightweight projects.
- Fold bias tape in half lengthwise
- Attach to pillow edge like regular piping
- Stitch close to folded edge
This adds visual interest without bulk.
Repurpose Fabric Scraps
Use leftover cotton napkins, tablecloths, or curtains for eco-friendly, unique piping. Ensure fabric weight matches the main body.
Maintain Your Piped Pillow
Proper care keeps your work looking fresh.
Clean Safely
- Check care labels
- Machine wash only if all components are pre-washed or colorfast
- Air dry to preserve shape
Store Properly
- Keep flat or loosely stacked
- Avoid heavy objects on top, as this flattens piping over time
Repair Minor Damage
If a seam loosens, re-stitch by hand with matching thread. Replace covers seasonally to refresh your décor.
Frequently Asked Questions About Piping Pillows
What is the easiest way to attach piping to a pillow?
The easiest method uses pre-made piping and a zipper foot. Baste the piping to the pillow front first, then sew with right sides together. Starting in the middle of a side (not at a corner) helps distribute tension evenly and prevents puckering.
What kind of cord do you use for pillow piping?
Use 3/8″ or 1/2″ welting cord made from stiff cotton or polyester. Stiff cords hold shape better and create a defined ridge. Soft cords work for garments but don’t provide the structure pillows need.
How do you sew piping around corners without bunching?
Clip the flange (not the stitching) 3–5 times before reaching the corner. Stop sewing about ½” before the corner, pivot with the needle down, fold the piping diagonally, then continue. Trimming diagonal corners after assembly also reduces bulk.
Can you attach piping without a zipper foot?
A zipper foot is strongly recommended because it lets you stitch close to the cord. Alternatives include a narrow base foot or a bulky overlock foot. A standard presser foot typically can’t get close enough without hitting the cord.
How much extra fabric do you need for piping?
For an 18″ pillow, you need roughly 76″ of piping length. Using 2″ wide bias strips, a 16″ x 16″ fabric square provides enough material. Always buy extra to account for mistakes and joining seams.
Why does my piping look loose or wobbly?
Loose piping usually means you’re stitching too far from the cord. Move your needle position to the far left with a zipper foot and sew as close to the cord as possible. Basting first also helps keep everything stable.
Key Takeaways for Perfect Piped Pillows
Attaching piping to a pillow combines precision with patience. Measure carefully using the formulas provided, always cut bias strips for flexibility, and baste before final sewing to prevent shifting. Mastering corner clipping and the continuous join method will elevate your work from homemade to professional.
Your next step: Gather your materials, cut a practice strip of bias fabric, and test your zipper foot on scrap fabric before starting your actual pillow. This quick warmup builds confidence and helps you dial in your stitch placement.