How to Build a Big Pillow Fort – Easy Steps
Creating a massive pillow fort transforms your living room into a magical hideout where movies play, stories come alive, and family memories form. Learning how to build a big pillow fort is easier than you think when you understand the key structural principles that keep walls standing and roofs secure. This guide covers everything from choosing the right location and gathering materials to adding themed decorations and ensuring safety. Whether you’re planning a movie night, a sleepover, or a quiet retreat, you’ll find proven methods that work for forts of any size.
Choose the Perfect Location for Your Fort
Picking the right spot sets the foundation for success. Your location determines how large your fort can be, how stable it becomes, and how comfortably everyone fits inside.
Find a Safe, Spacious Spot
The living room works best for most builds because it offers furniture for support, proximity to entertainment, and enough open space. The basement works well for larger structures where foot traffic stays low. Look for natural anchor points like a couch against a wall, a dining table for instant roofing, or stair banisters for tying rope ridge poles. Keep the fort away from lamps, radiators, electrical cords, and windows. Never block doors or hallways.
Measure Your Space First
A truly big fort needs room to spread out. Aim for at least 8 feet by 10 feet to comfortably fit three to four people with seating, snacks, and decorations. Mark your intended footprint with tape or pillows before assembling to ensure adequate space. Leave breathing room around the perimeter to prevent tripping hazards and allow easy access.
Protect Your Flooring
Place a rug or mat under furniture legs to prevent scratches on hardwood or tile. Add a memory foam topper, camp mattress, or thick duvet as your primary floor cushion. This layered base keeps occupants comfortable and defines the interior space of your fort.
Gather Essential Materials and Tools
You likely own everything needed for an impressive fort. Organizing materials in advance makes the building process smooth and enjoyable.
Use What You Already Have
Gather sturdy chairs, preferably four to six of similar height, plus a sofa, ottoman, or dining table for support structures. For roofing and walls, collect lightweight sheets, heavy blankets, and curtains. Stock up on sleeping pillows, couch cushions, and firm floor cushions for padding. A super-king-sized sheet provides the best roof coverage with minimal seams.
Stock Up on Fasteners and Anchors
Strong connections make or break your fort. Use clothespins and binder clips to create adjustable flaps and attach fabric. Keep a 25-foot nylon rope handy for the ridge pole method. Bungee cords and non-damaging tape secure edges, while heavy books or weights hold down fabric. Binder clips prove especially useful because they allow quick repositioning without damaging surfaces.
Add Decor and Atmosphere
Battery-powered fairy lights, LED lanterns, and glow sticks create magical ambiance safely. Include stuffed animals, photo garlands, and a named sign for personality. Store snacks, books, and games in a bin inside the fort. Repurpose holiday decorations like Christmas lights or glow-in-the-dark stars to save money.
Build a Stable Frame That Lasts

The frame determines how much space your fort offers and how long it stays standing. Choosing the right method matters for your intended use.
Use the Dual-Chair Method for Maximum Space
This method works best for large forts, sleepovers, and movie nights. Place a memory foam topper or mattress on the floor as your base. Position three chairs along each long side, backs facing inward, with one end pressed against a wall or sofa for support. Line the sides and head with couch cushions and firm pillows. Fill gaps between chair legs with small pillows to prevent sagging. This frame supports sitting upright and resists collapse better than single-row designs.
Try the Rope Ridge Pole Method for High Stability
When furniture placement is limited, tie a strong nylon rope between two secure anchor points like a stair banister and window blind track. Clip lightweight sheets to the rope using clothespins, letting fabric drape down to form walls. Reinforce the base with ottomans or stacked pillows. Test anchors by pulling firmly before adding fabric, and never use adhesive hooks not rated for load.
Combine Methods for Bigger Builds
Scale up by using a table as a roof and extending walls with chairs and rope. Build a couch-centric fort and add a second room with the ridge pole method. Create a corner cave connected to a central fort with a fabric tunnel. Hybrid designs create sprawling, multi-room hideouts that feel like real adventures.
Install a Secure Roof That Won’t Collapse
The roof affects light, warmth, and structural integrity. Installing it correctly prevents frustrating collapses during use.
Choose the Right Roof Material
Lightweight sheets let in ambient light and reduce collapse risk, making them perfect for daytime forts. Heavy comforters block light and create a cave-like feel, ideal for sleepovers or movie nights. Super-king-sized sheets cover more area with fewer seams, providing cleaner coverage.
Drape and Secure Properly
Lay the sheet over chair backs or ridge pole so it spans from seat to seat, not back to back. This reduces sag and increases stability. Secure edges by placing heavy books or pillows on chair seats, using binder clips to fasten fabric to chair backs, or weighing down corners with shoe boxes filled with books. When using multiple sheets, overlap them by at least 12 inches and clip together to prevent gaps.
Prevent Roof Collapse
Test tension by gently pressing on the center. If it sags too much, tighten the sheet by repositioning anchors. Add vertical supports by taping wooden dowels together and standing them in the center to lift the roof 30 to 50 centimeters. Use compression by placing a firm cushion across upright supports to lock them in place. The roof should dip slightly in the middle but never touch the ground.
Design a Comfortable Interior
The interior makes or breaks the experience. A well-designed inside invites people to stay and enjoy the space.
Layer the Floor for Maximum Comfort
Create a cushioned oasis with three layers. The base layer uses a memory foam topper or camp mattress. The middle layer adds soft blankets or rugs. The top layer provides throw pillows and floor cushions for seating. Carpet padding underneath adds insulation, especially important for hardwood or tile floors. Arrange seating in a circle or U-shape to encourage conversation.
Add Safe, Cool-Touch Lighting
Lighting sets the mood, but safety must come first. Use only battery-powered fairy lights, LED lanterns, glow sticks, or flashlights placed away from fabric. Never use candles, incandescent bulbs, or heat-emitting devices near the fort. Drape fairy lights across the ceiling or weave them through the frame for a magical glow.
Personalize the Space
Hang a wooden sign with the fort’s name at the entrance. Display photos, flags, or drawings. Include stuffed animals or themed toys. Play soft music via a Bluetooth speaker at low volume. Let everyone help decorate to boost engagement and ownership.
Add Themed Decorations and Lighting
Theming turns ordinary forts into unforgettable experiences. Choose a theme that matches your event or mood.
Build a Starry Night Space Fort
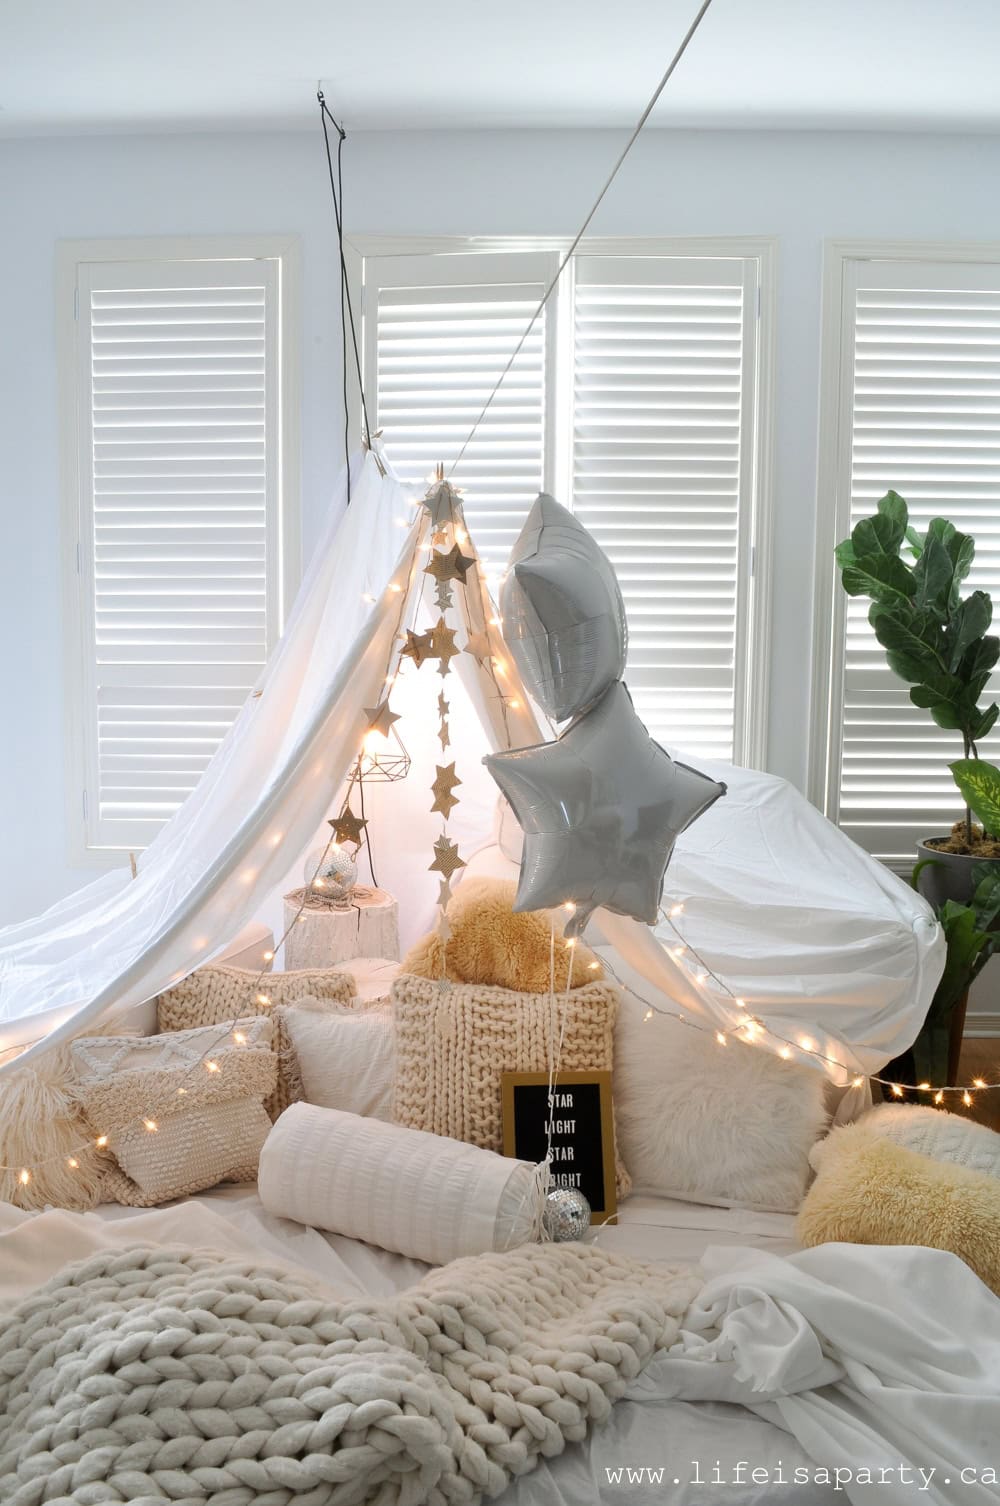
This themed fort works perfectly for birthdays, date nights, or special surprises. Use the rope ridge pole method for high ceiling clearance. Clip dark or white sheets to the rope for walls. Swag fairy lights across the top. Hang star garlands and glow-in-the-dark stars. Add a disco ball or mirrored ornament for sparkle. Serve star-shaped toast with Nutella, popcorn in star cups, and ginger ale with star-shaped sugar rims.
Try Other Popular Themes
The Castle Fort uses red and gold fabrics with turrets made from stacked pillows and includes toy swords and capes. The Secret Agent Fort covers light gaps with black or navy blankets and equips participants with walkie-talkies and flashlights. The Underwater Fort uses blue and green sheets, hangs plush sea creatures, and plays ocean sounds softly. Themes transform play into storytelling adventures.
Optimize Your Fort for Different Uses
Design matters based on how you plan to use the space. Different activities require different configurations.
Host a Movie Night
Position the fort in front of your TV for a private theater experience. Use a dark roof with heavy blankets. Stock a snack bin with popcorn and drinks. Ensure multiple seating options for everyone. Add USB-powered string lights around the entrance for a cinema vibe.
Plan a Sleepover Successfully
For overnight stays, prioritize comfort and safety. Use inflatable mattresses or sleeping bags. Keep flashlights handy for nighttime. Set quiet hours and establish fort rules. Always supervise young children. Create a “fort rules” sign specifying expectations like “Lights out at 9 PM.”
Create a Sensory Retreat
For relaxation or emotional regulation, build a Cozy Cave Fort in a quiet corner. Use high pillow walls on three sides, dim ambient lighting, faux fur throws, and calming music or nature sounds. This setup works well for kids needing downtime or anyone seeking a digital detox.
Follow Critical Safety Guidelines
Safety ensures everyone enjoys the fort without harm. Never skip these essential precautions.
Ensure Structural Stability
Test your fort before use by gently pressing on walls and roof. Check that chairs don’t wobble and confirm ropes are taut and anchored. Never place books, electronics, or lamps on top of the fort where they can fall and cause injury.
Maintain Airflow and Visibility
Never fully seal the fort. Leave at least one side partially open for ventilation to prevent CO2 buildup. Ensure occupants can be seen or heard at all times, especially young children.
Prevent Fire Hazards
Use only LED or battery-powered lights. Keep all wiring and devices away from fabric. Never leave lights unattended. Keep electrical outlets and cords clear of the fort’s footprint.
Clear Emergency Exits
Never block doors or hallways. Everyone must be able to exit quickly in case of fire or emergency. Supervise children at all times when inside the fort.
Turn Fort Building Into a Learning Experience
Building a big pillow fort teaches valuable skills while being fun. Kids develop creativity by designing layouts and themes. They practice spatial reasoning when understanding 3D space and balance. Problem-solving skills grow when fixing collapses or adjusting supports.
Practice Fine Motor and Teamwork Skills
Hands-on tasks build dexterity through clipping clothespins, tying knots, and arranging decorations. When built as a group, forts teach collaboration and communication. Assign roles: one person holds the sheet, another clips, a third arranges pillows.
Connect to Real-World Learning
Use the fort to teach physics by explaining tension and compression. Practice math by measuring fort dimensions or counting materials. Explore light and shadow by experimenting with flashlights inside. Turn cleanup into a lesson in responsibility by assigning each child a task.
Maintain and Store Your Fort Materials
Proper storage keeps materials ready for your next build. Most big pillow forts last one to three days as temporary setups, or up to one week if structurally sound and not blocking traffic.
Create a Fort Kit
Keep everything organized in labeled bins. Bin one stores sheets and blankets. Bin two holds pillows and cushions. Bin three contains clips, rope, lights, and decor. Store in a closet or under the bed for quick access.
Clean Up Efficiently
Follow this five-step routine. First, remove all items including snacks, books, and toys. Second, fold and store blankets and pillows. Third, untie ropes and unclip fabrics. Fourth, return furniture to original positions. Fifth, vacuum or sweep the area. Involve kids in cleanup to teach ownership and responsibility.
Frequently Asked Questions About Building a Big Pillow Fort
How do I keep my pillow fort from collapsing?
Use sturdy supports like metal or wooden chairs, not fragile stools. Apply tension by stretching fabric taut and use compression by placing firm cushions across upright supports to lock them in place. Test stability by gently pressing on walls and roof before allowing anyone inside.
What is the best method for a large pillow fort?
The dual-chair method with a mattress provides the most space and stability. Position three chairs along each long side of a mattress, backs facing inward, with one end against a wall or sofa. Line the sides with couch cushions and drape a super-king sheet over the top.
How do I add lighting safely inside a pillow fort?
Use only battery-powered fairy lights, LED lanterns, glow sticks, or flashlights. Never use candles, incandescent bulbs, or any heat-emitting device. Keep all lights away from fabric and never leave lights unattended.
Can a pillow fort be used for overnight sleepovers?
Yes, with proper preparation. Use inflatable mattresses or sleeping bags for comfort. Ensure ventilation by leaving one side partially open. Keep flashlights handy and establish quiet hours. Always supervise young children overnight.
What materials make the most stable pillow fort?
Sturdy chairs of similar height, a memory foam topper or mattress, super-king-sized sheets, firm couch cushions, and binder clips work best. A 25-foot nylon rope enables the ridge pole method for high stability. Avoid cardboard tubes, plush pillows, or unstable stools.
Key Takeaways for Building an Unforgettable Big Pillow Fort
Building a big pillow fort combines creativity, basic physics, and family fun. Choose a spacious location with anchor points, gather household materials, and select a structural method matching your needs. Prioritize safety by using only battery-powered lights, maintaining ventilation, and keeping exits clear. Layer flooring for comfort, add themed decorations for atmosphere, and store materials in a fort kit for quick rebuilds. Most importantly, involve everyone in the building process to create lasting memories together. A perfect fort doesn’t require perfection; it requires imagination and connection.