How to Make a Makeshift Heating Pad
You’re hunched over with back pain, cramps are hitting hard, or your shoulders feel like concrete, yet there’s no heating pad in sight. Before rushing to the store, consider this: you can craft an effective, soothing heating pad in minutes using common household items. Whether you need dry heat from rice, moist warmth from a towel, or even a low-voltage DIY electric version, learning how to make a makeshift heating pad is simple, safe, and budget-friendly. This guide walks you through three proven methods while emphasizing safety, customization, and proper use for optimal relief.
Heat therapy increases blood flow, relaxes tight muscles, and eases joint stiffness. A homemade solution delivers the same benefits as store-bought models, often with more flexibility and comfort. You’ll learn how to build each type, avoid common mistakes, and use your pad safely, especially if you’re managing menstrual cramps, neck strain, or arthritis.
Build a Rice-Filled Heating Pad

This reusable, moldable pad provides dry heat and is ideal for targeting sore necks, backs, knees, and abdomens. It heats quickly in the microwave and conforms to your body for targeted relief.
Choose Materials and Fabric
Use natural, breathable fabrics like cotton or flannel for the outer layer. Cut two identical pieces (12×12 inches works well for most uses). Add a middle insulating layer such as flannel, thermal fabric, or polyester batting to help retain heat and protect your skin.
Filling options include:
– Uncooked rice (the most common choice)
– Dried barley or oats (mold better to body curves)
– Dried beans (offer longer heat retention)
Avoid pasta or sugar-based fillers, as they scorch easily.
Sew and Fill the Pad
- Place the two main fabric pieces together with right sides facing inward.
- Sew three sides using a ½-inch seam allowance.
- Turn the pouch right-side out.
- Pour in about 1 cup of rice and do not overfill. Leave space so the pad stays flexible.
- For aromatherapy, mix in 1 to 2 tablespoons of dried lavender or eucalyptus.
- Hand-stitch or machine-sew the open side shut tightly.
Pro Tip: Reinforce seams for durability. A secure closure prevents leaks during heating.
No-Sew Option: Use a Sock
No sewing skills? Grab a clean large tube sock. Fill it ¾ full with rice. Tie the end with a rubber band, string, or knot. Microwave as directed. This quick fix is perfect for neck or back relief.
Heat and Use Safely
- Microwave on high for 1 to 2 minutes, checking every 30 seconds.
- Shake gently before use to distribute heat evenly.
- Wrap in a thin towel before applying to skin.
- Apply for 15 to 20 minutes and reheat as needed.
Replace rice every 6 to 12 months, or sooner if it smells musty or clumps. These are signs of moisture or mold.
Create a Microwave Towel Compress
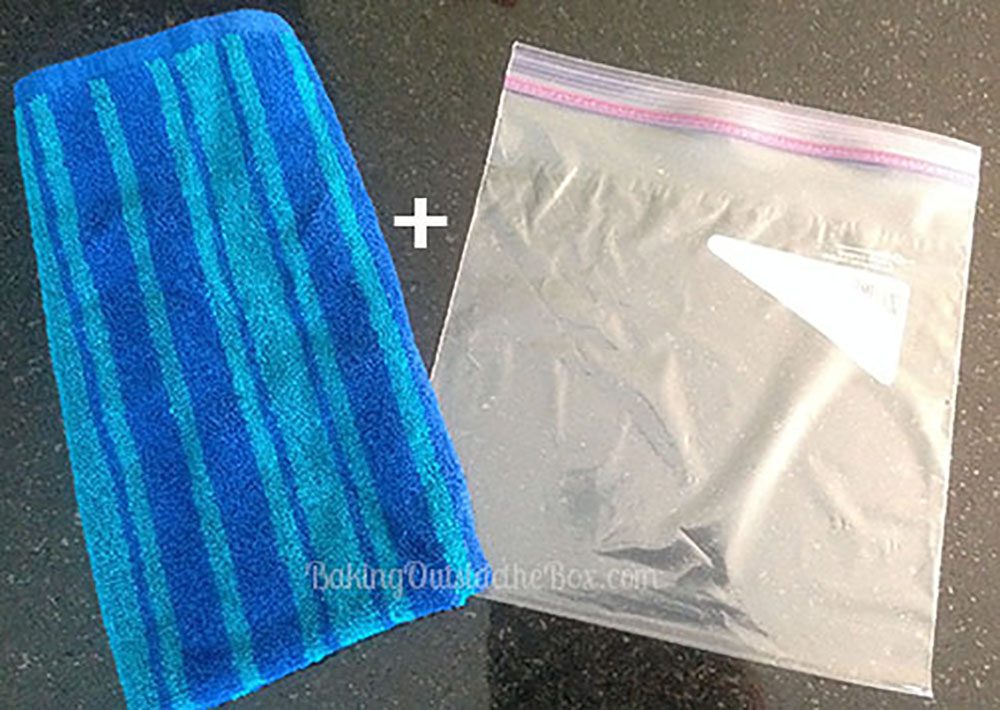
Need instant moist heat without sewing? The towel method delivers fast relief using items already in your bathroom.
Gather Supplies
You will need:
– Two hand towels
– One freezer-grade Ziploc bag
– Water
– Microwave
This method uses steam trapped in a sealed bag, surrounded by a damp towel for safe, even warmth.
Heat Step by Step
- Soak both towels in water, then squeeze out excess until damp but not dripping.
- Place one towel inside the open Ziploc bag. Do not seal yet.
- Microwave on high for 2 minutes.
- Carefully remove the bag (it will be hot) and seal it immediately to trap steam.
- Wrap the second damp towel around the sealed bag. It acts as a heat buffer.
- Apply to the affected area.
The compress stays warm for about 20 minutes and works well for cramps, stiff joints, or muscle spasms.
Prevent Burns and Steam Risks
Never seal the bag before microwaving, as trapped steam can cause it to burst. Always use the outer towel as insulation. Test temperature on your inner wrist first.
For longer heat, reheat the compress in 1-minute intervals.
DIY Low-Voltage Electric Heating Pad
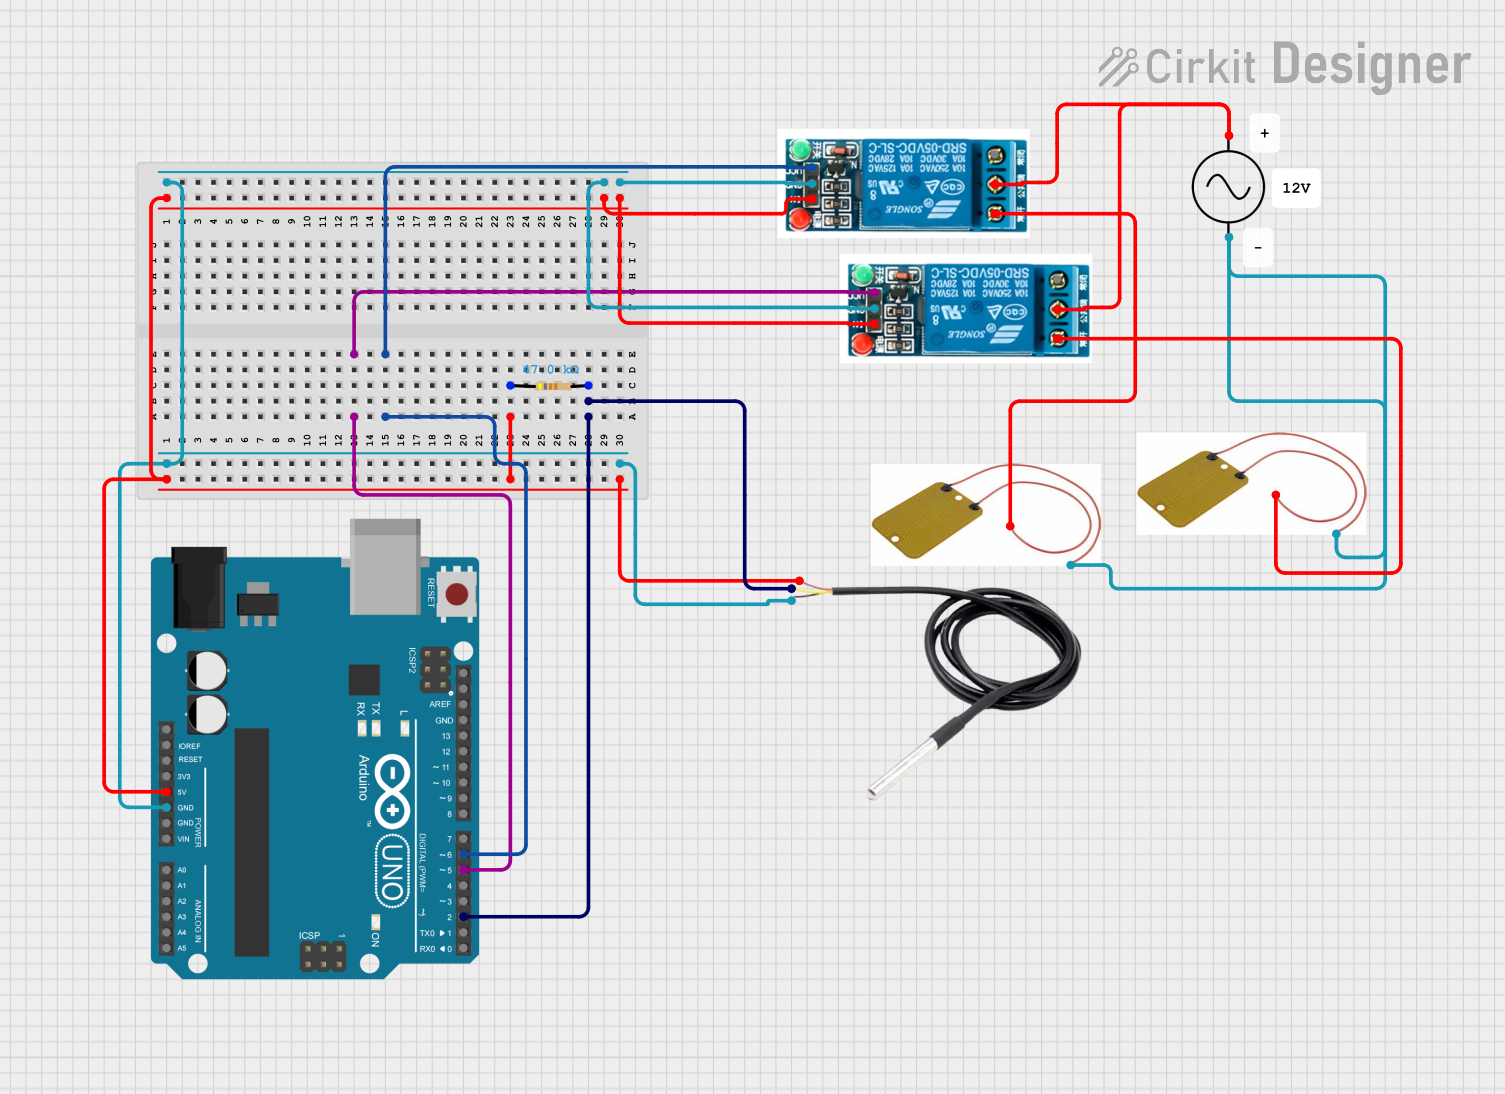
For consistent, cord-powered warmth, build a safe, low-voltage electric pad. This option is ideal for regular users who want control without relying on a microwave.
Warning: This involves electricity. Only attempt if you have basic wiring knowledge. Never use household AC voltage (110V/220V).
Assemble Safe Components
Required items include:
– Cotton or flannel fabric (two 12×12 inch pieces)
– Polyester batting for insulation
– Low-voltage resistive wire or heating coil (5V–12V DC)
– Battery pack or USB power source (such as a 5V adapter)
– Optional: thermostat for temperature control
– Heat-resistant electrical tape
– Sewing tools
Install the Heating Element
- Sew the fabric pieces together with right sides in, leaving a small opening.
- Turn right-side out and press flat.
- Insert the insulation layer.
- Lay the heating wire in a zigzag pattern across the center with no kinks or overlaps.
- Stitch small thread loops over the wire every 2 inches to hold it in place.
- Connect wire ends to the power source using wire connectors or solder.
- Insulate all connections with heat-resistant tape.
- (Optional) Add a thermostat in series to prevent overheating.
- Sew the opening closed securely.
Test Before Use
- Plug in the pad and let it run for 5 minutes.
- Feel for hot spots. Any area significantly hotter than the rest indicates poor wire distribution.
- If heat is uneven or smells strange, unplug immediately and recheck wiring.
Use only for 15 to 30 minutes at a time and never leave unattended.
Heat Therapy Safety Rules
Even homemade pads can cause burns or worsen injuries if misused. Follow these guidelines to stay safe.
Avoid Direct Skin Contact
Always place a towel or cloth barrier between the pad and your skin. Direct contact, even with a “warm” pad, can cause burns during prolonged use.
Limit Session Time
Stick to 15 to 30 minutes per session. Longer exposure increases burn risk and may inflame underlying tissue.
Check Temperature First
Test the pad on your inner wrist or forearm before applying to sensitive areas. It should feel warm, not hot.
Never Leave Unattended
Do not fall asleep with a heating pad on. Microwaved pads can overheat on reheating, and electrical versions may malfunction.
Who Should Avoid Heat Therapy?
Heat isn’t right for everyone. Consult a doctor before use if you have:
- Diabetes (reduced sensation in limbs)
- Poor circulation
- Numbness or nerve damage
- Open wounds or infections
- Pregnancy (especially avoid abdominal heat without medical approval)
- Cancer (heat may affect tumor areas)
- Elderly skin (more fragile and burn-prone)
- Infants or young children (inability to communicate discomfort)
For acute injuries like sprains or bruises, cold therapy is often better in the first 48 hours. Heat can increase swelling if applied too soon.
Customize for Comfort and Use
Make your pad more effective and personal with these enhancements.
Add Aromatherapy
Mix dried lavender, chamomile, or eucalyptus into the rice filling. The gentle scent promotes relaxation and complements pain relief.
Caution: Use only fully dried herbs. Moisture leads to mold. Replace filling at the first sign of odor.
Size and Shape for Body Parts
- Long rectangle (15×6 inches): Perfect for the spine or hamstrings
- Small square (8×8 inches): Ideal for hands, eyes, or temples
- Neck wrap design: Sew a longer, curved pad or use a sock tied around the neck
Choose the Right Fabric
- Flannel: Soft and cozy, great for bedtime use
- Cotton: Breathable and easy to clean
- Thermal fabric: Retains heat longer
For removable filling, add snaps or a zipper to one side. Just ensure no metal parts touch heating elements in electrical versions.
Compare Homemade vs. Store-Bought Pads

| Feature | Homemade Pad | Store-Bought Pad |
|---|---|---|
| Cost | $2–$5 (uses household items) | $20–$60+ |
| Safety | Lower risk (no high voltage) | Risk of overheating or shock |
| Customization | Fully customizable | Fixed size and settings |
| Heat Type | Dry (rice) or moist (towel) | Mostly dry electric |
| Portability | Excellent (no cords) | Limited by power cord |
| Durability | Rice lasts 6–12 months | Wires degrade over time |
Homemade pads win on cost, safety, and flexibility. Store-bought models offer convenience and consistent heat, but at a higher price and risk.
Fix Common Problems Fast
Even the best DIY pad can have issues. Here’s how to troubleshoot.
Pad Heats Unevenly
Cause: Overfilling or clumped rice.
Fix: Use only 1 cup for a 12×12 pad. Shake before each use.
Smells Burnt After Microwaving
Cause: Overheating, as the rice is scorching.
Fix: Reduce time. Heat in 30-second bursts. Discard and replace filling if burned.
Doesn’t Stay Warm Long
Cause: Thin fabric or no insulation.
Fix: Add a layer of flannel or batting inside. Ensure rice fills the pad fully but not tightly.
Feels Damp or Clumpy
Cause: Moisture in filling, which leads to mold.
Fix: Replace rice immediately. Store pad in a dry place. Never use wet hands to handle.
Electric Version Has Hot Spots
Cause: Kinked or bunched wire.
Fix: Redistribute wire in straight, even loops. Never cross or overlap.
Frequently Asked Questions About Makeshift Heating Pads
How long does a homemade heating pad stay warm?
A microwave-prepared rice or towel pad typically retains heat for about 20 minutes. You can reheat in 1-minute intervals if you need longer relief.
Can I use a makeshift heating pad while pregnant?
Consult a doctor before using any heating pad during pregnancy, especially on the abdomen or lower back. Medical guidance is essential to ensure safety for you and your baby.
Is it safe to sleep with a heating pad on?
No. Never fall asleep with a heating pad, whether homemade or store-bought. Microwaved pads can overheat on reheating, and electrical versions may malfunction, increasing burn and fire risks.
How often should I replace the rice in my heating pad?
Replace the rice every 6 to 12 months, or sooner if it smells musty, clumps, or shows signs of moisture. These are early indicators of mold growth.
What’s the best filling for a DIY heating pad?
Uncooked rice is the most common and reliable choice. Dried barley or oats mold better to body curves, while dried beans retain heat longer. Avoid pasta or sugar-based fillers, as they scorch easily.
Can I wash my rice-filled heating pad?
Do not submerge grain-filled pads in water. Spot-clean the fabric only. If you designed a removable cover with snaps or a zipper, you can wash just the cover.
Key Takeaways for Making Your Own Heating Pad
Learning how to make a makeshift heating pad empowers you to manage pain affordably and effectively. The rice-filled method offers reusable dry heat, the towel compress delivers quick moist warmth, and the low-voltage electric option provides consistent temperature control. Always prioritize safety by using a cloth barrier, limiting sessions to 15 to 30 minutes, and testing temperature before skin contact.
Your next step is simple: gather your materials today and build a basic rice-filled sock version. It takes less than five minutes and gives you immediate access to soothing relief whenever muscle tension or cramps strike.