How to Make a Pillow Out of Jeans
Got a pile of worn jeans taking up closet space? Turn them into stylish, budget-friendly home decor instead. Making a pillow out of jeans is one of the easiest ways to upcycle denim into durable, textured cushions that look far more expensive than they cost. This guide covers every step, from selecting the right pair of jeans to stitching a polished cover with pockets, hems, and that perfect faded indigo charm. With basic tools and a few hours of work, you can craft custom throw pillows that reflect your personal style while keeping textile waste out of the landfill.
Choose the Right Denim for Your Pillow Project
Pick Jeans by Size and Fit
Select jeans based on your desired pillow dimensions. Wide-leg or large jeans offer broad, continuous fabric ideal for solid front panels. Smaller or skinny jeans may require patching multiple pieces but provide varied indigo tones for a dynamic look. Always pre-wash and dry all denim to prevent shrinkage after sewing.
Save Key Design Features
Don’t discard the details. Back pockets, belt loops, original hems, and brand tags (like “Lucky You”) are design gold. Use pockets as functional mini storage or decorative accents. Cut around them carefully, leaving at least 2 inches of surrounding fabric for stability.
Sort by Shade and Wear
Separate denim scraps by indigo tone, including dark, medium, and faded. Mixing shades adds visual depth, especially in patchwork or woven designs. Worn areas like knees or thighs can be repurposed into focal points or avoided for structural seams.
Gather Tools and Supplies
Essential Sewing Tools
You’ll need a sewing machine with a denim needle (size 90/14 or 100/16) to pierce thick layers. A rotary cutter, self-healing mat, and ruler help slice straight strips. Use sharp fabric scissors for cutting curves and pockets.
Supporting Materials
Grab matching or contrasting thread (grey or black for vintage appeal), straight pins or clips, an iron, and a point turner or chopstick. For backing, use cotton canvas, linen, or a second denim piece. A 16″ x 16″ pillow insert is standard, but size up to 20″ for a fuller look.
Specialized Items for Advanced Styles
Weaving requires foam board and thumbtacks to stretch vertical strips. For rag-style fraying, have a washing machine ready. Cardboard templates (e.g., 52 cm x 6 cm) ensure consistent strip sizing.
Cut Fabric to Size
Measure for Seam Allowance
For a 16″ pillow, cut two 18″ x 18″ squares (adds 1″ total for ½” seam allowance on each side). For a 20″ insert, cut 22″ x 22″. Always press fabric flat before cutting.
Cut Leg Panels Efficiently
Slice jeans open along the inner and outer seams to lay flat. Each leg yields two long rectangles. Use these for large panels or cut into strips. Avoid twisting the fabric grain.
Prepare Shapes by Design Type
Different pillow styles require different cuts:
– Envelope cover: Cut two identical squares
– Patchwork: Cut 20″ long triangles (for a 16″ pillow), varying cut directions
– Weaving: Cut 18 strips at 6 cm x 52 cm
– Strip-sewn: Cut 2¼” wide x 22″ long strips
Label and organize pieces by shade and size.
Build the Pillow Front

Sew a Simple Envelope Front
Place two denim squares right sides together. Pin edges. Sew three sides with a ½” seam allowance. Trim corners diagonally. Turn right side out. Use a point turner to sharpen corners. Press flat.
Create a Patchwork Face
Lay a base fabric (same size as pillow) on a flat surface. Arrange denim triangles so diagonal edges overlap by 1 cm. Pin in place. Sew each edge with a straight stitch 1 cm from the edge, then reinforce with a narrow zigzag stitch along the raw edge. This encourages fraying after washing.
Weave a Denim Panel
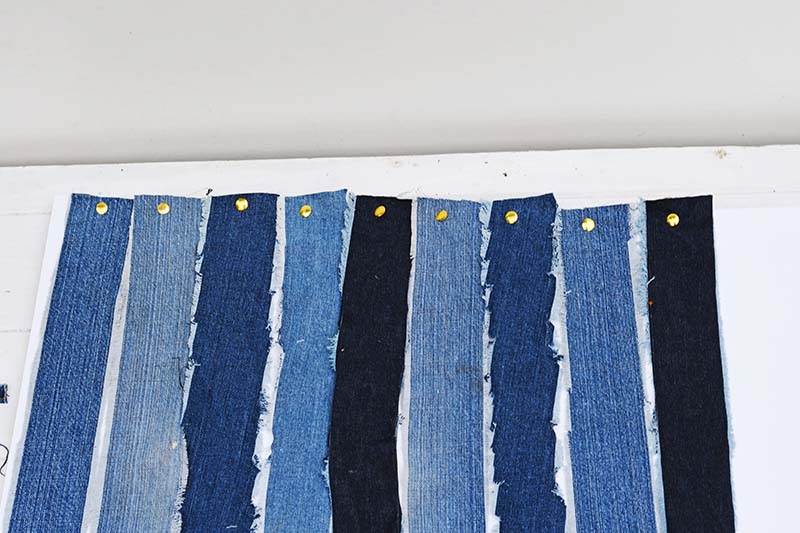
Pin 9 vertical denim strips side-by-side onto foam board, alternating light and dark. Weave 9 horizontal strips over and under. Secure intersections with thumbtacks. Once complete, remove from board. The woven piece becomes the front panel.
Join Strips for Rag Style
Sew 2¼” wide strips end-to-end until you form a large rectangle. Press seams flat. Wash in the machine to fray edges. Trim loose threads. Re-sew any undone seams. This creates a soft, textured front.
Make the Envelope Back

Use Original Seams for Authenticity
Cut a denim back panel 4″ wider than the pillow size (e.g., 24″ wide for a 20″ pillow). Cut along the original inseam to create two overlapping flaps. Fold raw edges under by ½” and press. Zigzag stitch to secure.
Overlap Flaps Correctly
Position one flap so it covers half the back, then place the second flap to overlap by 4″ (10 cm). This creates a hidden closure that fits snugly around the insert. The overlap should be centered at the bottom or side.
Match Fabric Weight
If using non-denim backing, choose medium-weight cotton. Cut two pieces: one full size, one ⅔ the width for the overlap. Sew the smaller piece to the larger with right sides together, then fold and press.
Assemble the Pillow Cover
Pin and Align Layers
Place front and back panels right sides together. Ensure envelope flaps are folded inward. Pin around all edges, matching corners and seams. Clip if fabric is too thick for pins.
Sew with Strong Stitches
Use a ½” seam allowance. Sew around the entire perimeter. Backstitch at start and end. Trim corners diagonally to reduce bulk. Clip curves if rounding edges.
Turn and Shape
Turn the cover right side out through the envelope opening. Use a chopstick or point turner to push out corners and edges. Gently pull flaps through.
Finish With Professional Details
Press for Crisp Edges
Iron the entire cover, focusing on seams and corners. Fold the envelope flaps inward ½” and press. This hides raw edges and gives a clean look.
Topstitch for Durability
Topstitch ¼” from the edge around all four sides. This flattens seams, prevents shifting, and adds a tailored finish. Use contrasting thread for a vintage industrial look.
Reinforce High-Stress Areas
Add bar tacks (tight zigzag stitches) at pocket corners and where flaps attach. This prevents tearing from repeated use.
Insert and Style the Pillow

Choose the Right Insert
Use a down or down-blend insert for a soft, moldable look that hides minor stitching flaws. Poly inserts work but may create a stiffer profile. Size insert to match your cover (e.g., 20″ insert for a 20″ cover).
Slide Into Envelope Back
Insert the pillow form through the overlap. Push corners fully into place. Fluff to distribute filling evenly.
Style With Denim Decor
Pair your DIY pillow with grey linen sofas, wooden furniture, or boho textiles. Use multiple denim pillows in varying washes for a layered look. Add a jute rug or macramé wall hanging to complete the vibe.
Maintain and Repair Your Denim Pillow
Clean Without Damage
Spot clean with mild soap and damp cloth. For deeper cleaning, hand wash in cold water and lay flat to dry. Avoid machine washing frayed-edge pillows to prevent unraveling.
Fix Fraying or Tears
Patch small holes with a denim scrap. Use a zigzag stitch around the edges. Re-stitch loose seams immediately to prevent widening.
Store Properly
Keep in a dry, ventilated area. Avoid plastic bins and use cotton storage bags to prevent moisture buildup. Rotate pillows monthly to ensure even wear.
Frequently Asked Questions About Making Pillows from Jeans
How many pairs of jeans do I need to make one pillow?
For a simple envelope cover, one pair of large jeans may suffice. For a woven 20″ x 20″ pillow, approximately 8 pairs of boys’ jeans (sizes 9–14) were used in one project to generate enough strips.
What needle should I use for sewing denim?
Use a dedicated denim needle (size 90/14 or 100/16) in your sewing machine. Standard needles may break or skip stitches when penetrating multiple layers of thick denim.
Can I machine wash a denim pillow?
Hand washing and air drying flat is preferred, especially for frayed-edge or patchwork designs. Machine washing may increase fraying or distortion. Spot cleaning is the safest option for decorative pillows.
How long does it take to make a denim pillow?
Total time is approximately 2.5 hours for a woven pillow. This includes about 30 minutes of prep (cutting, ironing) and 2 hours of active sewing and assembly. Simple envelope covers take less time.
What is the best pillow insert for a denim cover?
Down or down-blend inserts create a soft, moldable look that hides minor stitching flaws. Poly inserts work but produce a stiffer profile. Always match the insert size to your finished cover.
How do I prevent fraying on patchwork edges?
Sew each edge twice: first with a straight stitch 1 cm from the edge, then with a narrow zigzag stitch directly along the raw edge. This double-stitching secures the fabric while allowing controlled fraying after washing.
Key Takeaways for Your DIY Denim Pillow Project
Making a pillow out of jeans is a sustainable craft that transforms forgotten denim into durable, personalized home decor. Start by selecting jeans with interesting details like pockets or original hems, then choose your construction method based on your skill level. The envelope cover is perfect for beginners, while woven and patchwork designs offer more visual complexity. Always pre-wash your denim, use a denim needle, and finish with topstitching for a professional result. Grab your oldest pair of jeans, gather your tools, and create your first upcycled pillow today.